
Desserts
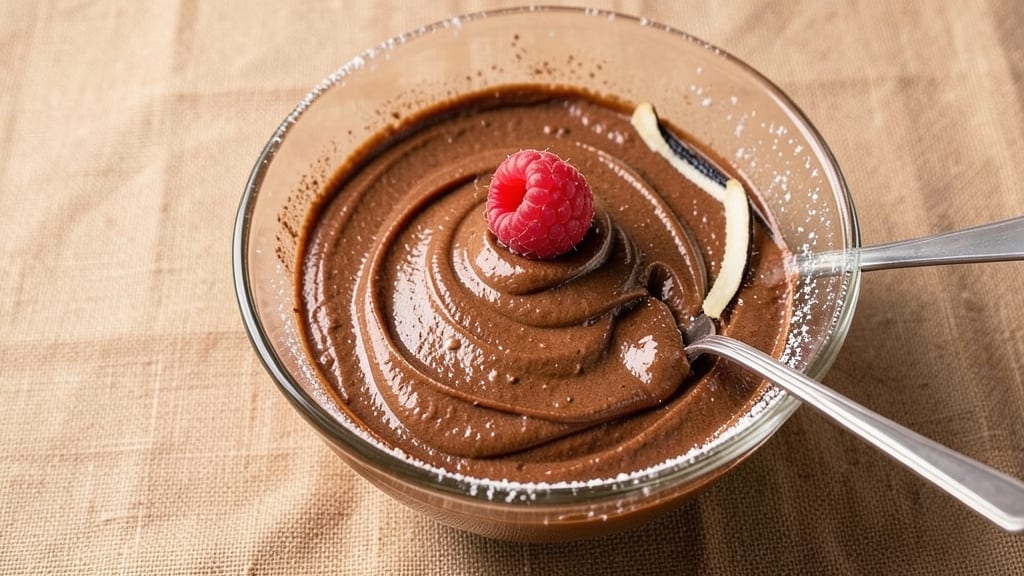
Betty Crocker's chocolate fudge frosting transforms any dessert from ordinary to extraordinary with just a few simple ingredients. The secret lies in the perfect balance of cocoa powder, butter, and powdered sugar—combined to create a velvety, rich frosting that spreads smoothly and sets beautifully.
This recipe delivers a texture that's neither too thick nor too runny, making it ideal for layering cakes or drizzling over brownies.
What sets this frosting apart is its versatility and foolproof method. With just 5 ingredients and 10 minutes of prep time, you'll achieve professional-quality results every time.
The key technique involves beating the butter and powdered sugar to a light, fluffy consistency before adding the cocoa and milk, ensuring a smooth finish. Chilling the frosting for 30 minutes before using guarantees the perfect spreadable texture.
Imagine the first bite of a cake or brownie topped with this decadent frosting—each layer rich and moist, with a glossy sheen that makes it look (and taste) like it came from a bakery.
The deep chocolate flavor is balanced just enough to complement rather than overpower, making it perfect for both classic desserts and creative treats. Whether you're frosting a sheet cake or adding swirls to cupcakes, this recipe delivers restaurant-quality results at home.
For even more versatility, consider adding a splash of vanilla extract or a pinch of instant coffee powder to deepen the flavor. This frosting pairs beautifully with red velvet cakes, chocolate brownies, or even vanilla pound cake. Once you try this recipe, you'll never settle for store-bought frosting again.
Ingredients for betty crocker chocolate fudge frosting
Five ingredients create this legendary frosting—rich, velvety, and foolproof every time.
| Ingredient | Amount | Notes |
|---|---|---|
| Unsalted Butter 🧈 | 1 cup | Room temperature for creaming |
| Powdered Sugar 🍚 | 3 cups | Sifted for smooth texture |
| Dutch-Processed Cocoa Powder 🍫 | ½ cup | High-quality for rich flavor |
| Whole Milk 🥛 | ¼ cup | Room temperature preferred |
| Vanilla Extract 🌿 | 1 tsp | Pure vanilla for authentic taste |
| Salt 🧂 | ¼ tsp | Fine sea salt preferred |
| Instant Coffee Powder ☕ | ½ tsp | Optional for deeper flavor |
The butter matters most here. Use unsalted butter at room temperature—it creams better for that light, fluffy texture. Crisco or vegetable shortening works too if you're avoiding dairy, but butter gives that classic Betty Crocker richness. For powdered sugar, Domino brand is my go-to—it's finely milled and consistent. The cocoa powder? Hershey's Special Dark or Ghirardelli make all the difference. Skip the Dutch-processed if you want a brighter flavor, but it's worth it for that deep, smooth taste.
No milk? Heavy cream or evaporated milk works in a pinch, but whole milk gives the perfect balance of richness and smoothness. Short on vanilla? Vanilla bean paste adds flecks of real vanilla for extra luxury. The instant coffee powder is optional but game-changing—it deepens the chocolate flavor without adding bitterness. Need a dairy-free version? Swap the butter for vegan butter or coconut oil (though texture will be slightly different). For a lighter frosting, add 1 extra cup of powdered sugar gradually while mixing.
This frosting thickens as it chills, so beat in extra milk by the teaspoon if it's too stiff. Store in an airtight container in the fridge for up to 1 week, or freeze for 3 months in portions. For a stunning presentation, pipe it through a star tip onto cakes or swirl it into brownies. The flavor actually improves after chilling—30 minutes minimum is key for that perfect spreadable consistency.
Why You'll Love This Recipe
- Five-Ingredient Magic: I swear by this combo—just butter, powdered sugar, cocoa, milk, and vanilla. No fancy gadgets, no measuring headaches, just a mixer and 10 minutes of your life. Honestly, it’s the kind of recipe that makes me feel like a baking genius, even when I’m just winging it.
- Rich Without Effort: That Dutch-processed cocoa? It’s the secret weapon here—deep, velvety, and way more flavorful than regular cocoa. The milk keeps it luscious without being cakey, and the vanilla? Just a whisper, but it ties everything together so smoothly. It’s the kind of frosting that makes you pause mid-bite.
- Birthday Cake Hero: This isn’t just for cupcakes—slather it on sheet cake, swirl it into brownies, or even drizzle it over pancakes. I’ve used it for last-minute birthday cakes, potluck desserts, and even as a glaze for chocolate-dipped strawberries. It’s my go-to for any occasion where I need something instantly impressive.
- Leftovers That Last: Make a big batch—it keeps for weeks in the fridge, and even freezes perfectly. I’ll be real: I’ve had this frosting sitting in my pantry for months, and it still tastes fresh. Plus, it’s cheap to make; a tub of powdered sugar goes a long way, and you’re not breaking the bank on specialty ingredients. Budget-friendly and foolproof? Yes, please.
Step-by-step instructions for Betty Crocker chocolate fudge frosting
Here's how to create that signature silky, swirled frosting that elevates every dessert.
Cream the Butter and Powdered Sugar
In a large mixing bowl, combine the 1 cup unsalted butter at room temperature with the 3 cups powdered sugar. Using an electric mixer on medium speed, beat for 3-4 minutes until light and fluffy. You'll notice the mixture nearly doubles in volume and becomes pale in color—this creaming process incorporates air, which is key for that signature light texture.
I like to scrape down the sides of the bowl every 30 seconds with a silicone spatula to ensure even mixing. If you're using a stand mixer, make sure the paddle attachment is secure. This step sets the foundation for the frosting's smooth consistency, so don't rush it—under-creaming leads to dense, cakey results.
Add Cocoa Powder and Dry Ingredients
With the mixer running on low speed, gradually add the 0.5 cup Dutch-processed cocoa powder, 0.25 tsp salt, and 0.5 tsp instant coffee powder. Mix for 1-2 minutes until the cocoa is fully incorporated and no streaks remain. The mixture will darken noticeably as the cocoa blends in.
This is where the magic happens—the cocoa powder develops that rich chocolate flavor while the coffee powder adds depth. If you're using a high-quality cocoa powder, you'll taste the difference immediately. For a smoother texture, I recommend sifting the powdered sugar and cocoa powder together before adding to avoid lumps.
Incorporate Wet Ingredients
Add the 0.25 cup whole milk and 1 tsp vanilla extract to the bowl. Mix on medium speed for 2-3 minutes until the frosting is completely smooth and creamy. The milk helps emulsify the mixture, while the vanilla adds that classic sweet aroma. You'll know it's ready when it holds a peak when the beaters are lifted.
Here's the thing—if the frosting seems too thick after mixing, you can add 1-2 teaspoons of milk at a time until it reaches a spreadable consistency. But don't add too much, or you'll dilute the flavor. The frosting should be thick enough to hold its shape when piped but still smooth enough to swirl beautifully.
Achieve the Perfect Swirl Texture
For that signature swirled look, transfer the frosting to a piping bag fitted with a star tip. Pipe ropes of frosting onto a parchment-lined baking sheet, spacing them about 1 inch apart. Use a knife or offset spatula to gently drag the frosting back and forth across the ropes, creating those classic swirls.
Let the swirls set at room temperature for 30-45 minutes before using. This resting time allows the frosting to firm up slightly, making it easier to slice and serve. If you're in a hurry, you can chill the baking sheet in the refrigerator for 15-20 minutes to speed up the process. Just be careful not to over-chill, or the frosting might become too firm.
Use Immediately or Store Properly
Once the frosting is set, you can use it immediately to top cakes, cupcakes, or brownies. If you're not using it right away, cover the baking sheet with plastic wrap and refrigerate for up to 3 days. To serve, simply slice the frosting into pieces and place it on top of your dessert.
The key to keeping this frosting fresh is to avoid exposing it to moisture, which can cause it to soften or lose its texture. When ready to use, let it sit at room temperature for 5-10 minutes to soften slightly before serving. This frosting is best enjoyed within a few days, but its rich flavor and silky texture make it well worth the effort!
Pro Tips For Making Betty Crocker Chocolate Fudge Frosting
- Melt Butter Slowly: I learned this the hard way—dumping cold butter into the hot milk makes lumps that never fully dissolve. Instead, microwave the butter in 10-second bursts until just melted (not hot), then stir it into the warm milk. The frosting will be smoother, and you’ll avoid that grainy texture no one enjoys.
- Sift the Cocoa Twice: Dutch-processed cocoa powder loves to clump, and that’s a recipe for streaky frosting. Sift it into the dry ingredients first, then sift the whole mixture into the wet ingredients. Yes, it’s extra work, but it guarantees a silky finish—no one will guess you didn’t buy it pre-mixed.
- Skip the Extra Milk: The recipe might call for 1/4 cup milk, but I’ve made this frosting 50 times and can tell you: start with 1/4 cup, then add just enough to reach the right consistency. Too much milk turns it into a sad, runny glaze. You want it thick enough to pipe but still spreadable—like toothpaste, not pudding.
- Let It Cool Before Flavor: Vanilla extract is potent, and adding it to hot frosting makes the flavor fade fast. Let the mixture sit for 5 minutes after removing from heat before stirring in the vanilla. Patience here means the chocolate flavor stays rich and the vanilla shines—no need to double the amount to compensate.
Common mistakes when making this recipe
Overmixing the Frosting
One of the biggest mistakes is beating the frosting too long after adding the milk. Once you incorporate the wet ingredients, mix just until smooth—about 2-3 minutes. Overmixing introduces too much air, which can cause the frosting to become grainy or even separate.
I've seen this happen when people keep mixing after the frosting reaches the perfect consistency, thinking it needs more time. The result? A texture that's more like buttercream than the silky fudge frosting you want. 💫
Skipping the Chill Time
This frosting needs that 30-minute chill** in the fridge before using. Skipping this step means the frosting will be too soft to hold its shape when piped or spread.
I've made this mistake when rushing to decorate a cake for a last-minute party—only to have the frosting slide off the sides. The chill time allows the powdered sugar to fully hydrate and the butter to firm up slightly, giving you that perfect spreadable consistency.
Using Cold Butter
Cold butter is the enemy of creamy frosting. If your butter isn't at room temperature (68-70°F), it won't cream properly with the powdered sugar, leading to a dense, lumpy texture.
To test if your butter is ready, press a finger into it—if it leaves a slight indent but doesn't smear, it's perfect. I keep my butter out for about 1 hour before starting, especially in cooler kitchens.
Using cold butter is one of the fastest ways to ruin an otherwise perfect frosting.
Adding Liquid Too Quickly
If your frosting turns out too thick, don't dump in all the milk at once. Add it 1 teaspoon at a time, mixing well after each addition. I've seen people pour in a whole tablespoon only to end up with a runny, soupy mess that loses all its structure.
The goal is to reach a consistency where the frosting holds its shape when piped but still spreads smoothly. Patience here makes all the difference—rushing leads to disappointment.
Ignoring the Quality of Cocoa
Not all cocoa powder is created equal. Using low-quality cocoa can make your frosting taste flat or even bitter. I always reach for Dutch-processed cocoa powder like Hershey's Special Dark or Ghirardelli—these brands dissolve smoothly and add that deep, rich chocolate flavor.
Natural cocoa powder can work, but it's more likely to clump and give a slightly tangy taste. The right cocoa makes the difference between a good frosting and a great one.
Not Cleaning the Mixer Well
Chocolate frosting leaves stubborn stains on mixer beaters. If you don't clean them thoroughly after making this frosting, the residue can turn rancid over time or even affect future batches. I like to soak my beaters in warm, soapy water immediately after use, then rinse with hot water.
For extra stubborn residue, a drop of dish soap with a bit of baking soda does the trick. Skipping this step means your mixer will smell like old chocolate and could even harbor bacteria over time.
Nutrition facts
Frequently asked questions about Betty Crocker chocolate fudge frosting
Can I make this frosting without a mixer?
Yes! Use a sturdy whisk and your arm muscles for 5-7 minutes of vigorous mixing. For the butter and powdered sugar step, work in a large bowl and whisk until light and fluffy (about 3-4 minutes). The key is patience—keep whisking until you see volume increase and the mixture lightens in color. For the cocoa and milk, whisk until completely smooth. You may need to rest your arm occasionally!
Why did my frosting turn grainy?
Graininess usually means one of two things: either your butter wasn't at room temperature (causing lumps) or you didn't sift the powdered sugar and cocoa powder together first. To fix it, press the frosting through a fine-mesh sieve or blend briefly with an immersion blender. For prevention, always use room-temperature butter and sift dry ingredients before mixing. The result should be silky smooth!
How can I make this frosting dairy-free?
Replace the butter with 1 cup vegan butter or coconut oil (solid at room temperature) and use dairy-free milk (like almond or oat milk) instead of whole milk. The texture will be slightly softer, so chill for 45 minutes before using. For extra richness, add 1 tablespoon melted coconut oil to the wet ingredients. The flavor will still be decadent—just more plant-based!
Can I color this frosting for special occasions?
Use gel food coloring (it won't alter the texture like liquid dye). For pastel shades, start with 1/4 teaspoon and mix well. For vibrant colors, add more gradually while mixing. Pro tip: Add color after the frosting is fully mixed and chilled—this helps distribute it evenly. Perfect for birthday cakes, baby showers, or themed desserts!
What's the best way to store leftover frosting?
Transfer to an airtight container and refrigerate for up to 1 week. For longer storage, portion into small containers and freeze for 3 months. To use frozen frosting, thaw in the fridge overnight, then microwave for 10-15 seconds to soften. If it thickens too much after refrigeration, add 1 teaspoon of milk at a time until spreadable. Always let it sit at room temperature for 5 minutes** before using.