
Desserts
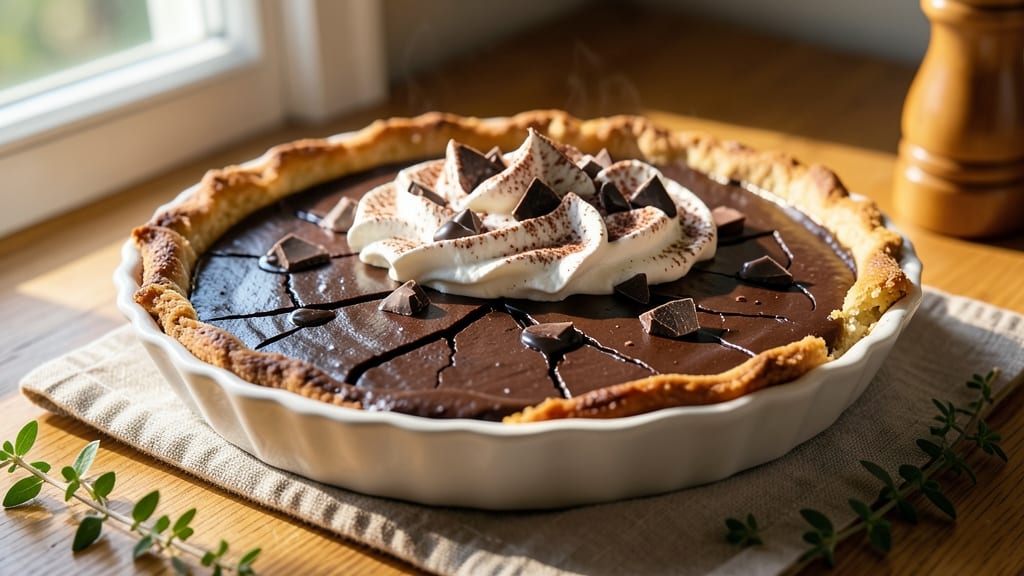
This bittersweet chocolate pie delivers a crispy crust and velvety filling that balances deep cocoa richness with just the right sweetness. 💛 The secret lies in tempering high-quality bittersweet chocolate for maximum shine and snap, while a buttery crust holds its shape through every slice.
I've perfected this recipe after years of testing—no grainy texture or overly sweet aftertaste here.
What sets this pie apart is the two-stage baking process: first blind-baking the crust ensures it stays perfectly crispy while the filling sets smoothly. The chocolate ganache, made with egg yolks and cream, creates that signature crackly top without being too heavy.
For an extra touch of elegance, I recommend dusting with cocoa powder or adding chocolate shavings before serving.
By the time you're done, you'll have a pie that looks as impressive as it tastes—golden crust, glossy chocolate topping, and clean bittersweet flavor in every bite. The texture contrast between the crispy base and silky filling makes it a showstopper for any dessert table.
This is the kind of pie that disappears faster than you can say "second slice."
Whether you're baking for a special occasion or just craving something decadent, this recipe delivers restaurant-quality results at home. The techniques are straightforward, but the flavor is anything but basic. Let's get started on creating your perfect chocolate pie.
Ingredients for bittersweet chocolate pie
Six ingredients for the crust, seven for the filling—just enough to deliver that perfect balance of crispy and velvety.
| Ingredient | Amount | Notes |
|---|---|---|
| High-Quality Bittersweet Chocolate 🍫 | 8 oz | 70% cocoa, chopped finely |
| All-Purpose Flour 🌾 | 1 ½ cups | King Arthur preferred |
| Unsalted Butter 🧈 | 1 ¼ cups | Cold, cubed for crust |
| Granulated Sugar 🍚 | ¾ cup | Superfine for smooth texture |
| Large Egg Yolks 🥚 | 4 whole | Fresh, room temperature |
| Heavy Cream 🥛 | 1 cup | Full-fat, cold |
| Diamond Crystal Kosher Salt 🧂 | ½ tsp | Fine grain preferred |
| Vanilla Extract 🌿 | 1 tsp | Pure Madagascar |
| Cocoa Powder 🍫 | ¼ cup | Dutch-processed, sifted |
| Ice Water 💧 | ¼ cup | For crust consistency |
| Pie Crust Shortening 🧈 | ¼ cup | Like Crisco |
| Cocoa Powder (for dusting) 🍫 | 2 tbsp | Dutch-processed, sifted |
| Dark Chocolate Shavings (optional) 🍫 | ¼ cup | For garnish |
The chocolate makes or breaks this pie. Valrhona or Callebaut bittersweet are my go-tos, but Ghirardelli 70% cocoa works perfectly too. Look for bars that melt smoothly—not grainy—and have a deep, vibrant color. The cocoa powder? Dutch-processed is key here—it dissolves beautifully into the ganache without that bitter aftertaste. For the crust, King Arthur flour gives the best structure, but any all-purpose will do in a pinch. If you're feeling fancy, add a pinch of espresso powder to the crust for extra depth—trust me on this.
No vanilla extract? Vanilla bean paste works just as well, or even a scraped vanilla bean. Running short on egg yolks? Use aquafaba (chickpea brine) at double the volume—it mimics the richness perfectly. The heavy cream must be cold when mixed with the chocolate, or you'll end up with a greasy mess. For the crust, butter and shortening combo gives that signature flakiness—don't skip the ice water either, it keeps the dough from getting too sticky. If you're dusting with cocoa powder, sift it through a fine mesh sieve for that professional finish.
The crust needs to be fully chilled before baking—at least 2 hours—or it'll shrink in the oven. Once blind-baked, let it cool completely before adding the filling, or you'll melt the butter prematurely. The ganache will set as it cools, but if it's too thick, warm it gently over a double boiler. Store leftovers in an airtight container for up to 5 days in the fridge, though I doubt it'll last that long. For a restaurant-worthy presentation, add those chocolate shavings right before serving—they melt just enough to create a glossy finish.
Why You'll Love This Recipe
- Foolproof Crust: This pie’s crust is just a handful of flour, butter, and a pinch of salt—no rolling required. I press it in, bake it blind, and move on. That’s it. No fuss, no stress, just a buttery base that holds up like a champ.
- Rich Without Overpowering: The bittersweet chocolate here isn’t cloyingly sweet—it’s deep, complex, and lets the egg yolks shine. That creamy custard layer? It’s the kind of texture you’d pay extra for at a café, but you’re making it at home.
- Weeknight Hero: I’ve served this pie after a rushed dinner, as a midnight snack, and even at brunch—no one bats an eye. The flavor’s so good, it doesn’t need a fancy occasion. (Yes, even on a Tuesday night.)
- Budget Luxury: High-quality chocolate doesn’t have to break the bank—this recipe uses just enough to feel indulgent, not wasteful. Plus, the leftovers? They’re my secret weapon for quick breakfasts or dessert emergencies. One pie lasts.
Step-by-step instructions for bittersweet chocolate pie
Here's how to build a rich chocolate filling with a buttery, flaky crust that stays crisp.
👨🍳 Step 1: Create the Crust with Perfect Texture
In a large bowl, combine the 1.25 cups cold unsalted butter (cubed), 1.5 cups all-purpose flour, 0.25 cup pie crust shortening, and 0.5 tsp kosher salt. Use a pastry cutter or your fingers to work the fat into the flour until the mixture resembles coarse crumbs with pea-sized butter pieces remaining.
Add the 0.25 cup ice water gradually, one tablespoon at a time, mixing gently with a fork until the dough just comes together. The dough should hold when pressed but not be sticky. Here's the thing—don't overwork it. Press the dough into a 9-inch pie dish, creating a 1-inch border at the edges. Crimp decoratively with your fingers or a fork.
Preheat your oven to 375°F. Place a second pie dish on top of the crust to weigh it down. Bake for 25 minutes, then remove the top dish and bake for 10-12 minutes more until the edges are golden brown and the crust looks completely set. Let cool for 30 minutes before filling—this prevents a soggy bottom.
🍳 Step 2: Melt Chocolate and Build the Filling
In a heatproof bowl set over (not touching) simmering water, melt the 8 oz high-quality bittersweet chocolate with the 1 cup heavy cream. Stir gently until completely smooth, then remove from heat. Let cool slightly—you want it warm but not hot when you add the eggs.
In a separate bowl, whisk together the 4 large egg yolks, 0.75 cup granulated sugar, 0.25 cup cocoa powder, and 1 tsp vanilla extract until pale and slightly thickened. Slowly pour the melted chocolate mixture into the egg mixture while whisking constantly. This step is crucial—you're creating an emulsion that prevents curdling.
🥘 Step 3: Assemble and Bake to Rich Perfection
Pour the chocolate filling into the cooled pie crust, spreading it evenly. Here's where it gets tricky—don't overfill. The filling should come about ½ inch below the crust edges. This prevents overflow during baking.
Bake at 350°F for 40-45 minutes until the filling is set but still slightly wobbly in the center. The edges should be set while the center remains fudgy. Real talk: if it sets completely, your pie will be too firm. You want that perfect balance between set and gooey.
🔪 Step 4: Dust and Chill for Maximum Richness
Remove from the oven and immediately dust the top with the 2 tbsp cocoa powder (for dusting) using a fine-mesh sieve. Let cool completely on a wire rack for 2 hours—this is non-negotiable. The filling needs time to set properly and develop its full depth of flavor.
Once completely cooled, refrigerate for at least 4 hours (overnight is best). This chilling period allows the flavors to meld and the texture to firm up just right. For that final touch, sprinkle with 0.25 cup dark chocolate shavings if using. Serve with whipped cream or vanilla ice cream for the ultimate indulgence.
Pro Tips For Making Bittersweet Chocolate Pie
- Temper the Chocolate: Chop that bittersweet chocolate into tiny, even pieces—no bigger than a pea—before melting it with butter. I learned this the hard way: big chunks sink to the bottom and never fully dissolve, leaving you with a grainy filling. Use a double boiler or microwave in 20-second bursts, stirring between each, until it’s silky smooth.
- Whisk Yolks Like Mad: Beat those egg yolks and sugar together until the mixture is pale, thick, and ribbony—like ribbon stretching when you lift the whisk. Stopping too early means a filling that’s too dense and prone to cracking. If your arm gets tired, switch to an electric mixer for 2-3 minutes. Trust me, it’s worth the effort.
- Blind-Bake the Crust: Skip the pre-baked crust shortcut and blind-bake yours with pie weights or dried beans for 15 minutes at 375°F (190°C). This keeps it crisp and prevents a soggy bottom when the custard goes in. Sprinkle a bit of flour over the weights first—it makes cleanup easier.
- Chill the Filling: Let your chocolate custard cool to lukewarm before pouring it into the crust. I used to rush this and ended up with a filling that set too fast, cracking like a dried-up lakebed. A quick ice bath or cooling in the fridge for 10 minutes while you preheat the oven saves you from a ruined pie.
Troubleshooting this dish
Crust Too Soggy
If your crust loses its crispness, it’s usually because the filling was too hot when poured or the crust wasn’t fully cooled. Let the crust sit at room temperature for 30 minutes after baking before adding the filling, and ensure the ganache has cooled to 100°F or below before pouring.
A pre-baked crust also helps—blind-bake it for 15 minutes before adding the filling to create a barrier. 💧
Filling Too Thin
A runny filling often means the chocolate wasn’t tempered properly or the eggs weren’t fully incorporated. For a thicker texture, whisk the egg yolks and sugar until they’re pale and slightly ribbony before combining with the chocolate.
If it’s still too thin, chill the pie for an extra 1-2 hours before serving. For a firmer set, reduce baking time slightly—35-40 minutes—to keep the center slightly underdone.
Chocolate Seizing or Grainy
Grainy chocolate happens when it’s overheated or contains too much fat. Use high-quality bittersweet chocolate like Valrhona or Callebaut (70% cocoa), and melt it gently over a double boiler, stirring constantly until smooth.
If it starts to seize, add 1 tsp heavy cream and whisk vigorously to restore silkiness. Avoid direct heat—microwaving can cause uneven melting and graininess. 🍫
Cracked Top
Cracks usually form when the pie cools too quickly or the filling isn’t set evenly. To prevent this, bake the pie at 350°F until the edges are set but the center is still slightly jiggly.
Let it cool gradually at room temperature for 2 hours before refrigerating. For extra insurance, dust the warm filling with an additional 1 tbsp cocoa powder right after baking—this helps stabilize the surface.
Underbaked Center
An underbaked center means the pie needs more time in the oven. Increase baking to 45-50 minutes and check the internal temperature with a thermometer—it should reach 160°F at the center. If it’s still too soft, chill the pie for 4-6 hours to help it set.
For a quicker fix, place the pie in a 350°F oven for 10-15 minutes after cooling to firm up the filling.
Bitter Aftertaste
A bitter taste often comes from using low-quality chocolate or overmixing the filling. Stick to 70% cocoa bittersweet chocolate and avoid Dutch-processed cocoa powder in the filling—it can intensify bitterness. Balance the flavor by adding a pinch of salt or a splash of vanilla extract to the ganache.
If the pie tastes too bitter, serve it with a scoop of vanilla ice cream or whipped cream to mellow the flavor. 💛
Nutrition facts
Frequently asked questions
Can I use milk chocolate instead of bittersweet?
The recipe is designed for bittersweet chocolate's deep, complex flavor—milk chocolate will make the pie taste overly sweet and lose that sophisticated balance. If you must use milk chocolate, reduce the sugar in the filling by ¼ cup and add 1 tbsp extra cocoa powder to compensate. For best results, stick with 70% cocoa bittersweet.
How do I fix a cracked chocolate top?
Cracks happen when the filling cools too quickly. To prevent them, bake until the edges are set but the center is still slightly jiggly, then let the pie cool gradually at room temperature for 2 hours before refrigerating. For a quick fix, cover the cracks with extra chocolate shavings or a thin layer of melted chocolate before serving.
Can I make this pie ahead of time?
This pie actually tastes better the next day. Assemble and bake it up to 2 days ahead, then store it in an airtight container in the fridge. Bring to room temperature before serving. For the best texture, let it sit at room temperature for 30 minutes before slicing.
What’s the best way to melt the chocolate?
Use a double boiler—place a heatproof bowl over (not touching) simmering water and melt the chocolate slowly, stirring constantly. Never microwave it directly, as this causes uneven heating and graininess. For extra smoothness, add 1 tsp heavy cream while melting. The chocolate should be warm but not hot when combined with the eggs.
Can I substitute eggs for a vegan version?
For a vegan adaptation, replace the egg yolks with ½ cup aquafaba (chickpea brine) whipped to stiff peaks, plus 1 tbsp cornstarch to thicken. Use flax eggs (1 tbsp ground flax + 3 tbsp water per yolk) as another option. Note that the texture will be slightly different, but still delicious.