
Desserts
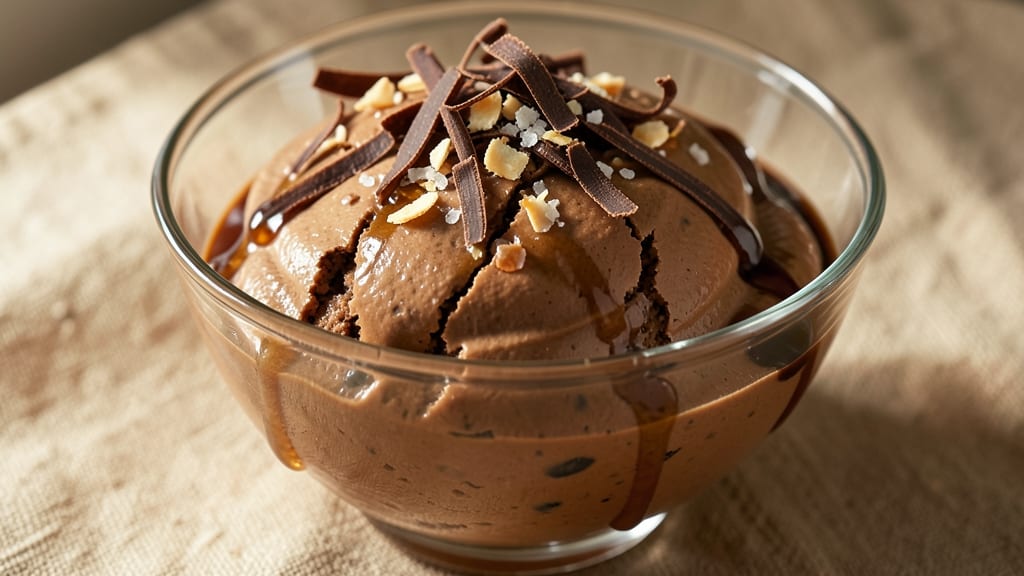
This black bean chocolate ice cream recipe proves plant-based desserts can be just as rich and indulgent as their dairy counterparts. The secret lies in blending silky black beans with cocoa powder and a touch of sweetener, creating a velvety texture that rivals traditional ice cream.
I developed this recipe after years of experimenting with vegan desserts, and it’s become my go-to for creamy, guilt-free chocolate ice cream that everyone loves.
The beauty of this recipe is its simplicity—just five core ingredients transform into a decadent dessert with minimal effort. Black beans provide the natural creaminess, while cocoa powder delivers deep chocolate flavor without overpowering the mix.
A splash of vanilla extract and your choice of sweetener (maple syrup or agave works perfectly) rounds out the taste, ensuring every spoonful is smooth and satisfying.
What makes this recipe truly special is how it balances texture and flavor. The blending process breaks down the beans into an ultra-smooth base, while the freezing technique creates a creamy, almost custard-like consistency. Top it with dark chocolate shavings or crushed nuts for added crunch and visual appeal.
Perfect for vegans, those with dairy sensitivities, or anyone craving a lighter yet equally delicious dessert, this recipe delivers restaurant-quality results at home. Let’s make ice cream that’s as good for you as it tastes!
Ingredients for black bean chocolate ice cream
Five simple ingredients create this ultra-creamy vegan chocolate ice cream that tastes indulgent.
| Ingredient | Amount | Notes |
|---|---|---|
| Canned Black Beans 🌱 | 1 ½ cups | Drained and rinsed thoroughly |
| Unsweetened Cocoa Powder 🍫 | ½ cup | Natural, no sugar added |
| Pure Maple Syrup 🍁 | ¼ cup | Grade B for richer flavor |
| Pure Vanilla Extract 🌿 | 1 tbsp | High-quality, pure vanilla |
| Cold-Filtered Water 💧 | ½ cup | Room temperature preferred |
| Dark Chocolate Shavings 🍫 | ¼ cup | 70% cocoa for garnish |
| Crushed Almonds 🥜 | ⅛ cup | For texture contrast |
| Pinch of Salt 🧂 | ⅛ tsp | Enhances chocolate flavor |
The black beans are the secret weapon here—look for canned beans with no added salt (like Low Sodium Black Beans from Trader Joe's or Goya). The cocoa powder should be unsweetened and natural—avoid Dutch-processed unless you want a milder flavor. Maple syrup adds richness, but Grade B (the darker kind) has a deeper caramel note that works perfectly. For the vanilla, I always use pure extract—the imitation stuff just doesn't cut it. The water is key for blending; room temperature ensures smoothness without lumps.
No maple syrup? Agave nectar or coconut sugar works in a pinch (use half the amount). Running short on cocoa powder? Melted dark chocolate (70% or higher) at double the amount gets you close. The almonds can be swapped for pecans or walnuts if you prefer. For a nut-free option, crushed graham crackers add texture instead. The salt is non-negotiable—it balances the sweetness and makes the chocolate taste richer. Pro tip: If your ice cream turns icy after freezing, blend it again for 10 seconds before serving.
Store the base mixture in an airtight container in the fridge for up to 3 days before churning. Once frozen, it keeps for 1 week in the freezer—portion into containers for easy scooping. For best texture, let it sit at room temperature for 5-10 minutes before serving. The chocolate shavings and nuts should be added fresh after scooping. This freezes beautifully, so double the batch if you're hosting—it’s always a crowd-pleaser.
Why You'll Love This Recipe
- Pantry Magic: I swear by this recipe because it turns five ingredients I always have into something decadent. No special shopping trips—just open a can, blend, and freeze.
- Rich Without Guilt: That deep cocoa and maple syrup combo? It’s like a hug for your taste buds, but the black beans make it secretly healthy—no one will believe it’s not loaded with cream.
- Freezer-Friendly Flex: Make a big batch when you’re craving it, then grab a scoop anytime. Perfect for post-dinner treats or when company drops by unexpectedly.
- Budget Bliss: A single can of beans and a bag of cocoa stretch to multiple servings. For under $5, I get a dessert that tastes like it cost ten times more. Worth every penny.
Step-by-step instructions for black bean chocolate ice cream
This creamy, plant-based dessert delivers rich chocolate flavor with a velvety texture you won't believe comes from beans.
Blend the Base Ingredients Until Silky Smooth
Combine the 1.5 cups drained and rinsed canned black beans, 0.5 cup unsweetened cocoa powder, 0.25 cup pure maple syrup, 1 tablespoon pure vanilla extract, 0.5 cup cold-filtered water, and the pinch of salt in a high-speed blender. I always use a dedicated blender for ice cream bases—it handles the thick texture better than a regular blender.
Blend on high speed for 1-2 minutes until completely smooth with no visible bean chunks. The mixture should be thick but still pourable. If it's too thick, add 1-2 tablespoons of cold water and blend again. This base is the foundation of your ice cream, so smoothness is critical for that creamy texture we're after. The beans provide natural fat and protein that mimics the richness of dairy-based ice cream.
Chill the Mixture Thoroughly Before Freezing
Transfer the blended mixture to a clean, airtight container and refrigerate for at least 4 hours, or preferably overnight. Chilling is essential—it prevents ice crystals from forming during freezing and ensures a smooth, creamy texture in the final product.
I like to press plastic wrap directly onto the surface before sealing to minimize air exposure. The colder the mixture is when you start freezing, the smoother the finished ice cream will be. You'll know it's ready when the mixture feels cold to the touch and has thickened slightly but remains spreadable.
Freeze in an Ice Cream Maker
Pour the chilled mixture into your ice cream maker and freeze according to the manufacturer's instructions, typically 20-25 minutes. The machine will churn the mixture while freezing it, creating that signature creamy texture. Don't skip this step—using an ice cream maker is the easiest way to get professional results.
If you don't have an ice cream maker, you can still achieve good results by spreading the mixture into a shallow container and freezing for 4-5 hours, stirring vigorously with a fork every 30 minutes to break up ice crystals. The texture won't be as smooth, but it will still be delicious. Either method works, but the ice cream maker gives you that perfect velvety consistency.
Add Toppings and Serve Immediately
Once the ice cream has reached a soft-serve consistency, transfer it to a serving bowl. Immediately sprinkle with 0.25 cup dark chocolate shavings and 0.125 cup crushed almonds for texture contrast. The chocolate shavings add a beautiful visual element and an extra layer of chocolate flavor, while the almonds provide a satisfying crunch.
Serve immediately while still soft for the best texture. If you need to store it, cover tightly with plastic wrap pressed directly onto the surface to prevent ice crystals. This ice cream keeps well in the freezer for up to 2 weeks, but it's so good I rarely have any left that long. The flavors meld beautifully together, creating a dessert that's rich, satisfying, and completely plant-based.
Pro Tips For Making Black Bean Chocolate Ice Cream
- Rinse and Drain Beans: The canned black beans always have that weird metallic tang from the liquid—skip blending it into your ice cream. Rinse them under cold water, then drain thoroughly before blending, or you’ll end up with a tinny aftertaste that even extra cocoa won’t fix.
- Blend in Stages: Black beans are stubborn. Pulse them in short bursts first—just until they break down—then switch to continuous blending while streaming in cold water. This keeps the mixture smooth without turning it into gluey paste that’ll seize up your blender.
- Don’t Skip the Chill: Let the blended base sit in the fridge for at least 4 hours before churning. Cold ingredients whip up faster and creamier, and skipping this step means your ice cream will either freeze like a brick or turn icier than a freezer burn victim.
- Use Less Water: The recipe might call for 1 cup of water, but start with ½ cup instead. You can always add more while blending—black bean mixtures absorb liquid differently than dairy, and too much water dilutes the chocolate flavor. Taste as you go.
Pro cooking tips for black bean chocolate ice cream
Blend Like a Pro
Use a high-speed blender (like a Vitamix or Ninja) for that ultra-smooth texture—regular blenders struggle with the thick bean mixture. Pulse first to break up any large chunks, then blend continuously for 1-2 minutes on high.
If the mixture gets too hot from blending, chill it briefly in the fridge before proceeding. I’ve found that room-temperature water helps prevent overheating during blending. 💫
Chilling is Key
Never skip the 4+ hour chill—this step prevents ice crystals and ensures a creamy finish. I like to spread the mixture in a thin layer on a tray and refrigerate for 2 hours before transferring to a container.
This speeds up the cooling process. If you’re short on time, place the container in an ice bath for 30 minutes while stirring occasionally. The colder the base, the smoother the ice cream.
Ice Cream Maker Hacks
If your ice cream maker has a scoopable bowl, freeze the mixture for 5 minutes before adding it to help it hold shape better. For no-churn methods, spread the mixture in a shallow metal loaf pan—it freezes faster and more evenly than glass. I’ve also had success using freezer-safe silicone molds for portion-controlled servings. Just
Texture Troubleshooting
If your ice cream turns icy, blend it again for 10-15 seconds before serving. For extra creaminess, add 1 tablespoon of coconut cream to the base before freezing. To prevent sticking, lightly grease the ice cream maker bowl with coconut oil. And if you’re using a hand-crank machine, work in small batches—overfilling leads to uneven freezing. 🔥
Topping Timing
Add toppings right after churning while the ice cream is still soft—this prevents them from sinking to the bottom. For a melted look, warm the chocolate shavings slightly before sprinkling. If you’re making this ahead, store toppings separately and add them fresh before serving.
I like to toast the almonds lightly in a dry pan for 2 minutes before crushing to enhance their flavor. The contrast of warm nuts and cold ice cream is pure magic.
Nutrition facts
Frequently asked questions
Why does this black bean ice cream taste so rich without dairy?
The black beans provide natural fat and protein that mimics creaminess, while the cocoa powder delivers deep chocolate flavor. The maple syrup adds sweetness without overpowering, and the vanilla enhances the overall richness. It's a perfect balance of textures and flavors that fool even non-vegans!
Can I make this recipe without an ice cream maker?
Yes! Spread the chilled mixture into a shallow container and freeze for 4-5 hours, stirring vigorously with a fork every 30 minutes to break up ice crystals. For best results, use a metal loaf pan as it freezes faster than glass. The texture won't be as smooth, but it will still be delicious and creamy.
How do I prevent the ice cream from getting icy?
Always chill the mixture thoroughly (at least 4 hours) before freezing, and use an ice cream maker for the smoothest texture. If it does get icy, simply blend it again for 10-15 seconds before serving. Adding 1 tablespoon of coconut cream to the base can also help prevent ice crystals from forming.
What's the best way to store leftovers?
Transfer the ice cream to an airtight container and press plastic wrap directly onto the surface to minimize air exposure. It keeps well in the freezer for up to 2 weeks. For best texture, let it sit at room temperature for 5-10 minutes before serving. If you're storing it long-term, consider portioning into individual containers for easy scooping.
Can I use different types of beans for this recipe?
Black beans work best because of their mild flavor and creamy texture, but you could experiment with great northern beans or kidney beans if needed. Just be aware that the flavor profile might change slightly. For the best results, stick with black beans—they're the star ingredient that makes this dessert so special!