
Desserts
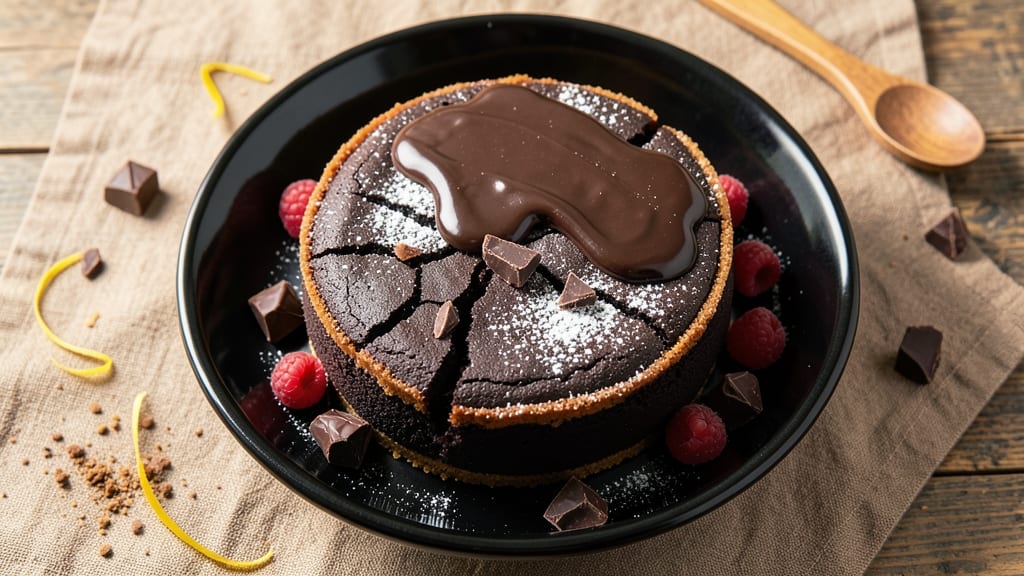
This black cocoa chocolate cake recipe delivers a decadent dessert with a molten fudge core and crunchy top that will impress even the most discerning dessert lovers. The deep, rich flavor of black cocoa—more intense than traditional cocoa—creates a complex, velvety texture that sets this cake apart.
I've perfected this recipe over years of baking, ensuring every slice is moist, rich, and perfectly balanced.
The secret to this cake lies in the two-stage baking process: a quick initial bake to set the edges, followed by a broiler finish to create that signature crunchy top. Black cocoa adds a subtle earthiness that complements the deep chocolate flavor without overpowering it.
The result is a cake with a fudgy center that melts in your mouth and a golden, crackly crust that adds texture.
Once baked, this cake pairs beautifully with a chocolate ganache or cream cheese frosting for extra indulgence. The contrast between the warm, gooey center and cool, creamy frosting makes each bite unforgettable.
Whether you're serving it at a dinner party or treating yourself, this cake is sure to become a favorite.
Ready to bake? This recipe is designed to be foolproof, with clear instructions and precise measurements for consistent results every time. Let's get started on creating a dessert that's as impressive as it is delicious.
Ingredients for black cocoa chocolate cake
Rich, velvety cocoa meets crispy perfection in this decadent dessert masterpiece.
| Ingredient | Amount | Notes |
|---|---|---|
| Black Cocoa Powder 🍫 | ¾ cup | High-quality, Dutch-processed preferred |
| All-Purpose Flour 🌾 | 2 ½ cups | Sifted for light texture |
| Granulated Sugar 🍚 | 2 cups | Superfine preferred for smooth batter |
| Unsalted Butter 🧈 | 1 ½ cups | Room temperature, full-fat |
| Large Eggs 🥚 | 4 whole | Room temperature, separated |
| Dark Brown Sugar 🍚 | ½ cup | Packed, for moisture |
| Baking Powder 🧂 | 1 ½ tsp | Aluminum-free preferred |
| Salt 🧂 | ½ tsp | Fine sea salt preferred |
| Vanilla Extract 🌿 | 2 tsp | Pure, high-quality extract |
| Hot Water 💧 | ½ cup | For blooming cocoa |
| Powdered Sugar 🍚 | 2 cups | For dusting top |
| Heavy Cream 🥛 | ½ cup | Chilled, for topping |
Black cocoa is the star here—Valrhona or Guittard are my go-tos, but any high-quality brand works. The difference between regular cocoa and black cocoa is like night and day: deeper, earthier, with that signature bittersweet edge. King Arthur or Bob's Red Mill flour is ideal for tender crumb, but don't stress if you've got basic all-purpose. For the butter, Plugrá or Land O'Lakes are reliable, but any good brand will do. Room temperature is key—press the butter between two sheets of parchment and microwave for 20 seconds if it's cold. The eggs? Room temperature makes all the difference—separate them and let them sit out for 30 minutes before using.
No black cocoa? Substitute with 1/3 cup extra Dutch-process cocoa powder plus 1/4 cup unsweetened cocoa powder—it won't be identical, but it'll work in a pinch. Short on powdered sugar for the topping? Superfine sugar works at a 1:1 ratio, but it won't be as smooth. The vanilla extract should be pure—Nike or McCormick are solid choices, but even generic brands will do. For the hot water, boiled and cooled is best to fully bloom the cocoa's flavor. Want extra richness? Add 1 tbsp of instant espresso powder to the dry ingredients—it deepens the chocolate flavor without adding bitterness.
The cake keeps beautifully for 3-4 days in an airtight container at room temperature, but honestly, it's best eaten fresh. For longer storage, wrap tightly and refrigerate for up to 1 week. The crunchy top softens when reheated, so I recommend serving it at room temperature. If you're making it ahead, bake it a day early, store it properly, and bring it to room temperature before serving. The contrast between the warm, gooey center and crispy top is what makes this cake unforgettable—don't skip the broiler finish!
Why You'll Love This Recipe
- No Mixer Needed: I swear by this recipe when I’m too tired to cream butter and sugar properly. The black cocoa powder does all the heavy lifting—just melt the butter, mix in the dry ingredients, and fold in eggs. The batter’s rich but not gloppy, and the eggs add structure without fuss.
- Deep, Earthy Richness: That first bite? It’s like biting into a moody, sophisticated dessert—dark, slightly bitter, but with just enough sweetness to balance it. The black cocoa isn’t overpowering; it’s a whisper of depth that makes regular chocolate cake feel basic. (Yes, even my coffee-loving husband asks for seconds.)
- Crowd-Pleaser Any Day: Bring this to a potluck, a birthday, or just a lazy Sunday, and no one will question your dessert choice. It’s not too fancy to feel like a special occasion, but it’s got that wow factor when sliced. Honestly, I’ve served it at book club, holiday dinners, and even as a "just because" treat—and it’s always the first to disappear.
- Budget-Friendly Luxury: You’d never guess how affordable this is. Black cocoa powder is a game-changer—it’s cheaper than premium cocoa but gives that luxurious, velvety texture. A single cake feeds six, and leftovers? They freeze beautifully for when cravings hit. Between us, I’ve made this for under $5 a serving, and it tastes like I spent hours baking.
Step-by-step instructions for black cocoa chocolate cake
Here's how to craft a decadent black cocoa cake with a molten fudge center and crispy top—every detail matters.
Bloom the Black Cocoa for Maximum Flavor
In a small bowl, whisk together the 0.75 cup black cocoa powder and 0.5 cup hot water until completely dissolved. This step, called blooming, intensifies the cocoa's rich flavor and prevents bitter clumps in the batter. Let the mixture sit for 5 minutes while you prepare the remaining ingredients—you'll notice it thickens slightly into a glossy paste.
I always use Dutch-processed cocoa for this recipe because it's smoother and less acidic than natural cocoa. If your cocoa is lumpy after blooming, strain it through a fine-mesh sieve to ensure a silky batter. The bloomed cocoa will be your flavor foundation, so don't skip this crucial step—it makes all the difference in depth of chocolate taste.
Cream Butter and Sugars to Lighten the Batter
In a stand mixer fitted with the paddle attachment, beat the 1.5 cups unsalted butter (at room temperature) with the 2 cups granulated sugar and 0.5 cup dark brown sugar on medium speed for 3-4 minutes. You're looking for a pale, fluffy mixture that nearly doubles in volume and leaves clean streaks on the bowl when you lift the paddle.
The reason we wait until the butter is fully creamed is that this incorporates air, which creates that signature light, airy texture. If your butter isn't soft enough, the mixture will look greasy and won't hold air properly. Press between your fingers to test—it should give slightly but hold its shape. Scrape down the sides of the bowl every minute to ensure even mixing.
Combine Wet Ingredients for Smooth Batter
Add the 4 whole large eggs, one at a time, mixing on low speed after each addition until fully incorporated. Then add the 2 tsp vanilla extract and the bloomed cocoa mixture. Mix on low speed for another 30 seconds just to combine—don't overmix or you'll develop gluten in the flour.
Here's the thing—adding the bloomed cocoa last prevents it from settling at the bottom of the bowl. The batter should be thick but pourable at this stage. If it looks too stiff, you can add 1-2 tablespoons of milk (though our recipe doesn't call for it), but the measurements are precise enough that this shouldn't be necessary if you've followed the previous steps carefully.
Fold in Dry Ingredients Gently
In a separate bowl, sift together the 2.5 cups all-purpose flour, 1.5 tsp baking powder, and 0.5 tsp salt. With the mixer on low speed, gradually add the dry ingredients to the wet mixture, mixing just until combined. You should still see some flour streaks—this indicates proper mixing without overdevelopment.
Real talk: Overmixing is the enemy of tender cakes. Once the flour is incorporated, stop mixing immediately. The batter should be smooth and thick, like a rich chocolate pudding. If you're using a hand mixer, do this in two batches to avoid overworking the batter. Transfer the batter to a prepared cake pan and smooth the top with a spatula.
Bake to Perfection with Precision Timing
Preheat your oven to 350°F and prepare two 8-inch round cake pans by greasing them thoroughly with butter and flouring the bottoms. Divide the batter evenly between the pans. Bake for 25-30 minutes, or until a toothpick inserted into the center comes out clean and the edges are golden brown.
The key to a successful bake is patience—don't open the oven door during the first 20 minutes of baking. The cake needs time to set properly. When it's done, let the cakes cool in the pans for 10 minutes, then transfer to a wire rack to cool completely. This resting period prevents cracking and ensures even slicing later. For that signature crunchy top, I recommend brushing the warm cakes with a simple syrup made from equal parts sugar and water while they're still slightly warm.
Pro Tips For Making Black Cocoa Chocolate Cake
- SIFT THE COCOA: Black cocoa powder is not the same as Dutch-process cocoa—it’s bitterer and more intense, so don’t use the same amount as a regular recipe. Start with 2 tablespoons per cup of flour, taste the batter, then adjust. I learned this the hard way after a cake that tasted like a chocolate brick.
- CREAM THE BUTTER SLOW: Beat the butter and sugar until it’s light and airy—not just pale, but fluffy enough to hold a peak when you lift the beaters. If you rush this, your cake will be dense. I used to stop at "softened," but now I go until it’s nearly doubled in volume.
- DON’T OVERMIX THE BATTER: Once you fold in the dry ingredients, stop mixing the second everything’s just combined. Overworking the batter makes gluten toughen up, and your cake will turn out chewy instead of tender. Two turns of a spatula is all you need—yes, even if it looks uneven.
- CHILL THE BATTER 30 MINUTES: Let the batter sit in the fridge while you preheat the oven. This helps the flavors meld and prevents a domed top when it bakes. I skipped this once and ended up with a sad, lopsided cake—now I never forget.
Perfect pairings for this dish
Creamy Frosting Options
For this rich cake, I recommend a chocolate ganache made with ½ cup heavy cream and 8 oz dark chocolate (70% cocoa). Heat the cream until steaming, pour over chopped chocolate, then let sit for 5 minutes before whisking smooth.
The velvety texture contrasts beautifully with the cake's crunchy top. 🍫
Fruit Pairings
Bright, tart berries cut through the richness perfectly. Try raspberry coulis (simmer 1 cup raspberries with 2 tbsp sugar and 1 tbsp lemon juice) or fresh strawberries arranged on top. For a tropical twist, add mango slices and a sprinkle of toasted coconut flakes.
Coffee Infusion
Enhance the chocolate depth by adding a coffee glaze. Mix ½ cup powdered sugar with 2 tbsp strong brewed coffee and 1 tsp vanilla extract. Drizzle over the cake before serving for a sophisticated finish. A shot of espresso alongside pairs wonderfully too. ☕
Boozy Elevations
For adults, a splash of bourbon or Kahlúa in the ganache adds warmth. Stir 1 tbsp bourbon into the hot cream before pouring over chocolate. Alternatively, serve with a glass of red wine—a bold Cabernet Sauvignon or Port complements the deep cocoa flavors.
Crunchy Toppings
Add texture with crushed peppermint or sea salt flakes on top. For a nutty crunch, sprinkle with toasted hazelnuts or pecans. These contrast the cake's fudgy center while adding visual appeal. A pinch of flaky salt right before serving elevates every bite. 🌟
Nutrition facts
Frequently asked questions
What makes black cocoa different from regular cocoa?
Black cocoa is more concentrated and less processed than traditional cocoa, giving it a deeper, earthier flavor with a subtle bittersweet edge. It contains no sugar or dairy, making it ideal for rich desserts like this cake. The intense flavor means you need less (just 0.75 cup) compared to regular cocoa.
Can I substitute black cocoa with regular cocoa?
Yes, but the flavor won't be identical. Use 1/3 cup extra Dutch-process cocoa powder plus 1/4 cup unsweetened cocoa powder for a similar depth. The texture will be slightly less intense, but it'll still taste delicious. For best results, bloom the cocoa with hot water as directed.
Why does the cake need a broiler finish?
The broiler creates the signature crunchy top that contrasts beautifully with the fudgy center. Place the cake on the middle rack 3-4 inches from the heat for 1-2 minutes—watch closely to avoid burning. This step adds texture and visual appeal that makes the cake truly special.
How do I store leftovers?
Keep the cake in an airtight container at room temperature for 3-4 days, or refrigerate for up to 1 week. The crunchy top softens when reheated, so serve at room temperature. For longer storage, freeze individual slices wrapped in plastic for up to 3 months. Thaw overnight in the fridge.
Can I make this cake in a different pan size?
For best results, stick to 8-inch round pans—this recipe is designed for two layers. If using a 9-inch pan, reduce baking time by 2-3 minutes and check for doneness early. For a single layer, divide the batter between one 9-inch pan and one 8-inch pan for even baking.