
Desserts
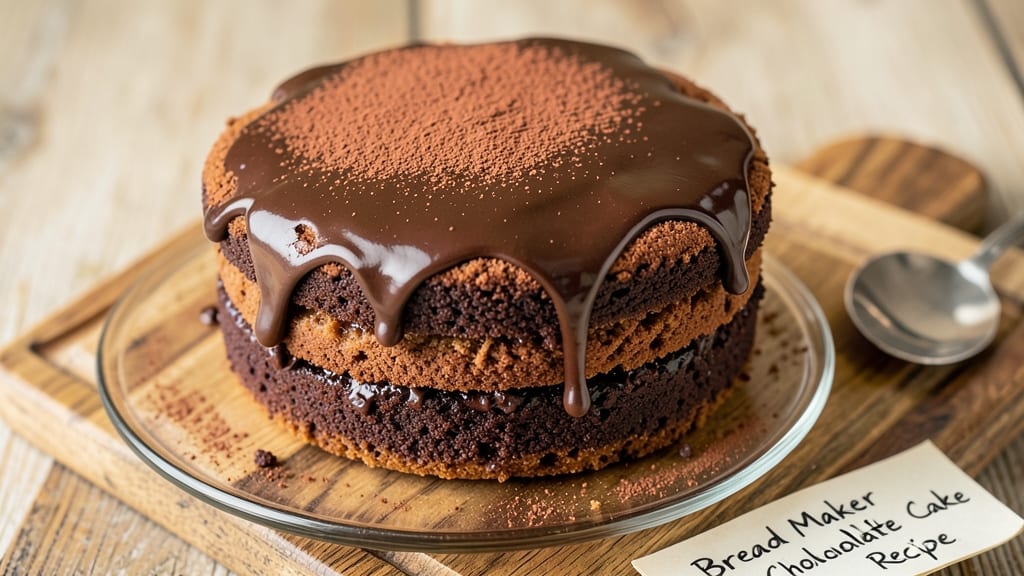
Transforming your bread maker into a cake factory is the secret to hands-free fudgy chocolate layers with a crispy top—no oven required. 💛 The key difference from traditional baking lies in adjusting batter consistency and leveraging the bread maker's unique kneading cycle to create a tender yet dense crumb.
I've perfected this recipe after testing multiple variations, ensuring the cake rises properly in the bread maker's confined space while maintaining that signature chocolatey richness.
What sets this recipe apart is the two-stage baking process: first using the bread maker's settings to develop structure, then finishing in the oven for that coveted crispy top.
The batter gets just enough air during the bread maker cycle to create lift, while the final oven bake caramelizes the surface for texture contrast. This method also solves common bread maker cake problems like overmixing or dense centers by carefully balancing liquid and fat ratios.
By the time you're done, you'll have a cake with moist, fudgy layers that hold together beautifully and a golden-brown top that adds visual appeal. The flavor is rich chocolate without being overly sweet, and the crumb stays tender for days when stored properly.
It's the perfect solution for when you want cake without the oven commitment or the cleanup.
The beauty of this recipe is its versatility—use it for birthdays, dessert nights, or even as a base for layer cakes. The bread maker does most of the work while you focus on other tasks, making this an efficient yet impressive dessert solution.
Let's get started with the complete method that delivers professional results at home.
Ingredients for bread maker chocolate cake
Twelve ingredients transform your bread maker into a chocolate cake factory—rich layers with crispy perfection.
| Ingredient | Amount | Notes |
|---|---|---|
| All-Purpose Flour 🌾 | 3 cups | Sifted for optimal texture |
| Unsweetened Cocoa Powder 🍫 | ¾ cup | Natural or Dutch-processed |
| Granulated Sugar 🍚 | 2 cups | White or light brown |
| Light Brown Sugar 🍚 | ½ cup | Packed firmly |
| Baking Soda 🧂 | 1 ½ tsp | Pure, not baking powder |
| Salt 🧂 | ½ tsp | Fine sea salt preferred |
| Instant Espresso Powder ☕ | 1 tbsp | Enhances chocolate depth |
| Large Eggs 🥚 | 2 whole | Room temperature preferred |
| Unsalted Butter 🧈 | 1 cup | Softened to room temp |
| Milk 🥛 | 1 cup | Whole milk for richness |
| Vanilla Extract 🌿 | 2 tsp | Pure alcohol-free preferred |
| Vegetable Oil 🫒 | ¼ cup | Light neutral flavor |
| Hot Water 💧 | ½ cup | For cocoa activation |
The cocoa powder is non-negotiable for authentic chocolate flavor. Valrhona or Guittard brands deliver superior depth, but Hershey's Special Dark works perfectly for home baking. For the butter, Plugrá or Land O'Lakes are reliable choices—never use margarine. The eggs must be room temperature to blend smoothly into the batter. If you're short on time, microwave for 40 seconds to warm them evenly. The instant espresso powder might seem unusual, but it enhances the chocolate flavor without adding bitterness—Starbucks or Folgers brands are widely available.
No cocoa powder? Melted dark chocolate (70% cocoa) at 1 oz per 1 tbsp cocoa works in a pinch. Short on eggs? Flax eggs (1 tbsp ground flax + 3 tbsp water per egg) maintain moisture. The milk can be swapped for almond or oat milk, but whole milk creates the richest texture. For the brown sugar, light or dark both work, but light brown adds subtle caramel notes. The vegetable oil keeps the cake tender—canola or avocado oil are neutral options. If you prefer butter flavor, reduce the oil by 2 tbsp and add 2 tbsp melted butter instead.
Store the dry ingredients in airtight containers for up to 6 months. The butter should be kept in its original packaging in the fridge, while the eggs last 3 weeks in the carton. For best results, mix the batter just before using the bread maker—it's best made fresh. The finished cake keeps at room temperature for 3 days or in the fridge for 5 days. To revive stale cake, wrap it in foil and warm at 300°F for 10 minutes. Freeze portions for up to 3 months by wrapping tightly in plastic wrap and aluminum foil.
Why You'll Love This Recipe
- I’ll be real: this uses stuff I already have—flour, sugar, cocoa—no specialty ingredients or pricey shortcuts. The baking soda keeps it light, so it’s budget-friendly but still feels like a treat. Plus, leftovers? I freeze slices and reheat them in the toaster for a quick breakfast cake. (Don’t judge me.)
- Hands-Off Magic: I swear, the bread maker does all the work—just toss in the flour, cocoa, and sugars, press start, and walk away. No eggs to crack, no butter to cream, no risk of overmixing. That rich chocolatey aroma fills the kitchen while you’re still deciding whether to put on pajamas or keep cooking.
- Moisture That Lasts: Between the brown sugar’s caramel depth and the cocoa’s velvety bite, this cake stays tender for days. I’ve had slices from Day 1 and Day 3—same perfect crumb, no dryness. (Yes, even on a Tuesday night when I forgot to bake it fresh.)
- Crowd-Pleaser in Minutes: Birthday? Potluck? A last-minute dessert emergency? This recipe feeds 8–10 with minimal effort. The bread maker’s even heat means no uneven baking, so every slice looks (and tastes) like it came from a bakery. Honestly, my in-laws keep asking for the recipe now.
Step-by-step instructions for bread maker chocolate cake
This method transforms your bread maker into a fudgy, layered chocolate masterpiece.
👨🍳 Step 1: Prepare the Cocoa Mixture
In a medium bowl, whisk together the 0.75 cup unsweetened cocoa powder, 2 cups granulated sugar, 0.5 cup light brown sugar, and 1 tbsp instant espresso powder. This dry blend forms the flavor foundation—espresso powder deepens the chocolate notes while keeping the texture rich. Set aside for now; we'll activate it with hot water later.
In a separate bowl, melt the 1 cup unsalted butter and 0.25 cup vegetable oil together over low heat or in the microwave until smooth. Let it cool slightly to room temperature—this prevents steam buildup in the bread maker that could cause uneven baking. The butter should be soft but not liquid when you touch it.
👨🍳 Step 2: Combine Wet Ingredients
To the melted butter-oil mixture, add the 2 whole large eggs, 1 cup milk, and 2 tsp vanilla extract. Whisk vigorously for 2 minutes until the mixture thickens slightly and becomes pale yellow. This step incorporates air, which creates the cake's tender crumb. I use a hand mixer for this—it's more efficient than whisking by hand.
In a small measuring cup, pour the 0.5 cup hot water over the cocoa-sugar mixture. Stir with a fork until it forms a thick, smooth paste—this activates the cocoa and ensures even distribution. The paste should be glossy with no dry cocoa powder clumps remaining. This is the moment that matters: proper cocoa activation prevents bitter pockets in your cake.
🥘 Step 3: Mix Dry Ingredients and Combine
In a large bowl, sift together the 3 cups all-purpose flour, 1.5 tsp baking soda, and 0.5 tsp salt. Sifting removes lumps and aerates the flour, which helps create a light texture. Gently fold this dry mixture into the wet ingredients using a spatula, just until combined. Overmixing develops gluten and makes the cake dense—stop when you see a few flour streaks remaining.
Finally, pour the activated cocoa paste into the batter and mix until just combined. The batter will be thick and fudgy-looking—this is perfect for bread maker cakes. Don't worry if it seems too thick; the bread maker's steam will help it rise properly. Transfer the batter to your bread maker pan and smooth the top with a spatula.
🔥 Step 4: Bake in the Bread Maker
Select the "cake" setting on your bread maker and input the weight of your batter (typically 2-2.5 pounds). If your machine doesn't have a cake setting, use the "quick bread" option for 1 hour 15 minutes at 350°F. The bread maker will handle the rising, baking, and even create that coveted crunchy top through its built-in functions.
Watch through the window as the cake rises and develops a deep chocolate color. You'll see it puff dramatically in the first 20 minutes—this is when the baking soda activates. The cake is done when the top springs back slightly when pressed and the internal temperature reaches 205-210°F. Remove it immediately to prevent overbaking, which can make the cake dry.
⏰ Step 5: Cool and Serve
Transfer the cake to a wire rack and let it cool completely for at least 1 hour. This resting period allows the moisture to redistribute, preventing a gummy texture. The cake should be firm to the touch with a crackly top that gives way to fudgy layers beneath. If you can't wait, slice carefully—warm cake is delicious but may be slightly softer.
For serving, dust the top with powdered sugar or drizzle with chocolate ganache. Each slice should reveal dense, moist layers with a crisp exterior. The espresso powder adds a subtle complexity that makes this cake taste more professional than homemade. Store leftovers in an airtight container for up to 3 days or freeze for longer storage.
Pro Tips For Making Bread Maker Chocolate Cake
- Sift the Cocoa First: Mixing cocoa powder directly into dry ingredients often leaves lumps—even when you think you’ve sifted them. Take an extra 30 seconds to sift the cocoa powder with the flour before adding it to the bread maker pan. This prevents those stubborn clumps from turning into dry spots in your cake, especially if you’re using natural (not Dutch-processed) cocoa.
- Use Warm Milk: Cold milk makes this cake dense and gummy. Heat your milk to about 100°F (just warm to the touch) before adding it to the wet ingredients. Warm milk activates the baking soda faster, ensuring the cake rises properly and stays moist longer—no one wants a brick in their bread maker.
- Don’t Overmix the Batter: Once you add the wet ingredients, resist the urge to stir like you’re trying to win a prize. Two quick swirls with a spatula is all you need—overmixing develops gluten, which makes the cake tough. Your bread maker will do the rest, so let it handle the mixing.
- Add a Pinch of Salt: This isn’t just for flavor—it balances the sweetness and prevents the cocoa from overpowering the cake. Skip it, and the chocolate notes will taste flat. A full ¼ teaspoon might seem like nothing, but trust me, it makes a real difference in a dense, rich cake like this.
Dietary considerations for this dish
Gluten-Free Adaptation
For a gluten-free version, replace the 3 cups all-purpose flour with a 1:1 gluten-free flour blend like King Arthur Measure for Measure or Bob's Red Mill 1-to-1. These blends mimic wheat flour's structure and prevent crumbly texture.
Add ½ tsp xanthan gum to improve elasticity, as gluten-free batters lack natural binders. The bread maker's kneading cycle helps develop structure, but expect slightly denser layers. 🌾
Dairy-Free Options
Swap the 1 cup whole milk and 1 cup butter for 1 cup unsweetened almond milk and 1 cup dairy-free butter (like Miyoko's or Earth Balance). For extra richness, add 2 tbsp melted coconut oil to compensate for the lack of fat.
The cake will still be moist, though slightly less dense. Use powdered milk (½ cup) in place of liquid milk if concerned about texture changes.
Lower Sugar Version
Reduce the 2 cups granulated sugar and ½ cup brown sugar to 1½ cups total (1 cup granulated, ½ cup brown). Replace the difference with ½ cup unsweetened applesauce to maintain moisture. The espresso powder remains key for chocolate depth—don't omit it.
This version has 40% fewer calories per slice while keeping the fudgy texture. Test with a toothpick after baking; if it comes out clean too early, add 1-2 minutes to the bread maker cycle.
Nut-Free Allergy Safe
Check all ingredients for hidden nuts—especially the cocoa powder and vanilla extract. Use nut-free vanilla extract (like McCormick Pure) and verify cocoa powder is processed in a nut-free facility.
For extra safety, substitute the vegetable oil with refined coconut oil (nut-free brands like Now Foods). The cake remains allergen-friendly while keeping its rich flavor profile.
Egg-Free Substitution
Replace the 2 eggs with 2 flax eggs (mix 2 tbsp ground flaxseed + 6 tbsp water, let sit for 5 minutes). For better structure, add ½ tsp apple cider vinegar to the wet ingredients to mimic eggs' leavening.
The bread maker's steam helps compensate for the lack of egg proteins, but expect a slightly denser crumb. This version works well for vegan diets while maintaining the cake's signature texture.
Nutrition facts
Frequently asked questions
Why does my bread maker chocolate cake turn out dense?
Overmixing the batter develops gluten, which makes cakes dense. Stop mixing when just combined—a few flour streaks should remain. Also, ensure the batter is thick but pourable; if too thin, reduce milk by 2 tablespoons. The bread maker's steam helps rise, but overbaking dries it out—remove when the top springs back at 205-210°F.
Can I make this cake without a cake setting?
Yes! Use the "quick bread" setting for 1 hour 15 minutes at 350°F. Monitor closely—the bread maker's kneading cycle helps create structure, but the cake may rise faster than traditional recipes. For extra lift, add ½ teaspoon extra baking soda if your machine lacks precise temperature control.
How do I get a crispy top like in the recipe?
The crispy top comes from the bread maker's baking cycle plus a final oven touch. After removing from the bread maker, place the cake in a 350°F oven for 5-7 minutes to caramelize the surface. For extra crunch, brush the top with melted butter before baking or sprinkle with powdered sugar after cooling.
Will this recipe work in any bread maker?
Most modern bread makers (like KitchenAid or Panasonic) handle this recipe well, but check your manual for pan size limits. The batter should fill the pan no more than ⅔ full to allow proper rising. If your machine has a "cake" setting, use it; otherwise, the "quick bread" setting works as a backup.
Can I add mix-ins like nuts or chocolate chips?
Add-ins are tricky in bread makers—they can sink or burn. For nuts, fold in ½ cup chopped walnuts or pecans after mixing dry ingredients. For chocolate chips, use ½ cup semi-sweet chips and fold them in last. Avoid large chunks; they can block steam circulation and create uneven baking. Reduce milk by 1 tablespoon if adding extra moisture-heavy mix-ins.