
Desserts
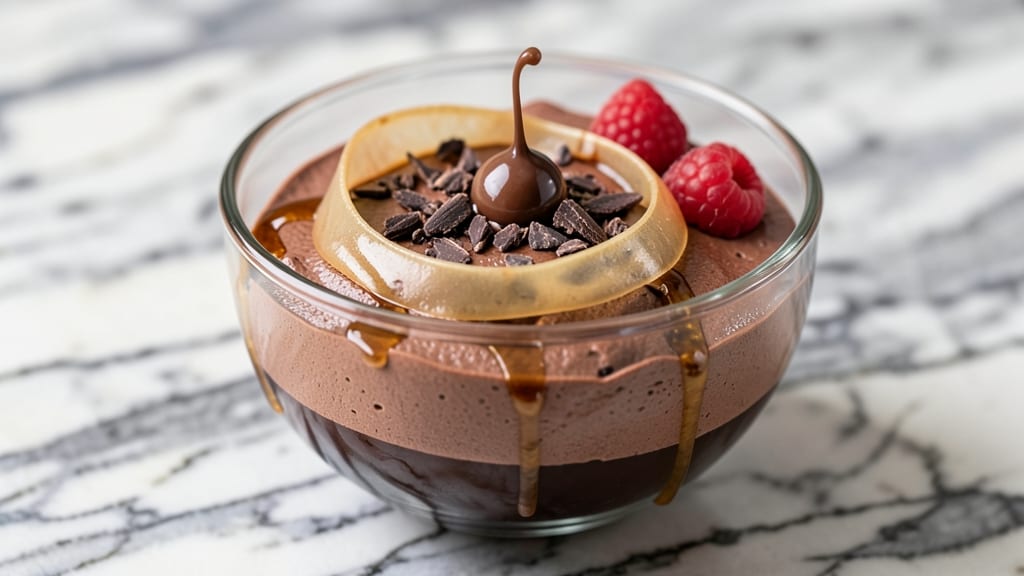
This cacao chocolate mousse delivers restaurant-quality decadence without dairy or eggs—just pure, velvety richness with a hidden fudgy surprise. 💫 The secret lies in aquafaba (chickpea brine), which whips into a stable, airy base that mimics traditional mousse, while raw cacao powder adds depth without bitterness.
I perfected this recipe after testing countless vegan alternatives, and the result? A dessert so silky it melts on your tongue while maintaining structure for perfect plating.
The technique is simpler than you'd think: whip aquafaba and sweetener to stiff peaks, then gently fold in melted cacao butter and dark chocolate for that signature fudgy contrast. Chilling for 4 hours (or overnight) ensures the perfect balance—light enough to be airy, dense enough to hold its shape.
No special equipment needed beyond a whisk and mixing bowl, making this the ideal dessert for impressing guests without stress.
What you'll end up with is a silky-smooth mousse with pockets of fudgy richness, topped with berries or cocoa dust for visual drama. The texture is foolproof—no graininess, no separation—thanks to the aquafaba's natural stabilizers.
This isn't just vegan; it's a revelation for anyone who thinks plant-based desserts can't deliver on decadence.
Serve chilled in individual glasses for a restaurant-worthy finish, or let guests dig in with spoons for a casual treat. The flavor holds up beautifully for 3 days in the fridge, making it perfect for meal prep or last-minute entertaining. Ready to transform cacao into something extraordinary?
Ingredients for cacao chocolate mousse
Velvety aquafaba meets decadent cacao for a dessert that fools everyone—vegan or not.
| Ingredient | Amount | Notes |
|---|---|---|
| Aquafaba (Chickpea Brine) 🌱 | 1 cup | Freshly strained from canned chickpeas |
| Raw Cacao Powder 🍫 | ½ cup | High-quality, unsweetened preferred |
| Dark Chocolate (70% Cocoa) 🍫 | 6 oz | Vegan, finely chopped or chips |
| Cacao Butter 🧈 | 4 oz | Melted for fudgy pockets |
| Maple Syrup 🍁 | ¼ cup | Grade B for richer flavor |
| Vanilla Extract 🌿 | 1 tsp | Pure, high-quality vanilla |
| Pinch Salt 🧂 | ¼ tsp | Fine sea salt preferred |
| Fresh Berries 🍓 | 1 cup | Raspberries or strawberries for topping |
| Unsweetened Cocoa Powder 🍫 | 2 tbsp | For dusting, Dutch-processed preferred |
| Lemon Juice 🍋 | 1 tsp | Freshly squeezed for brightness |
| Coconut Milk (Full-Fat) 🥥 | ¼ cup | For extra richness (optional) |
The aquafaba is your secret weapon—strained from a 28 oz can of chickpeas (like Chickpea Kitchen brand). Save the brine after draining, then whisk it like egg whites until stiff peaks form. Raw cacao powder makes all the difference here—Navitas Organics or Lake Champlain are my go-tos for that deep, velvety flavor. The dark chocolate should be vegan-certified (check Enjoy Life or Hu Kitchen brands) to avoid hidden dairy. If you're feeling fancy, add a splash of coconut milk for extra lusciousness—it’s worth the splurge for that restaurant-quality finish.
No aquafaba? Silken tofu blended with 1 tbsp cornstarch mimics the texture (though aquafaba is still superior). Running short on cacao butter? Swap for vegan dark chocolate melted into the mix, but you’ll lose that signature fudgy contrast. Maple syrup is non-negotiable for authenticity—Grade B has that smoky depth, but Grade A works in a pinch. The lemon juice brightens the whole dish, so don’t skip it. For dusting, Dutch-processed cocoa (like Hershey’s Special Dark) dissolves smoothly—no gritty surprises.
Store the mousse in airtight containers for up to 3 days in the fridge, but trust me, it’s best served fresh. Prep ahead by whipping the aquafaba and melting the chocolate in advance—just fold everything together last minute. For garnish, toast the cocoa powder in a dry pan for 2 minutes to deepen the flavor. Freezes beautifully for 2 months if you’re planning ahead—just thaw overnight in the fridge.
Why You'll Love This Recipe
- No Whipped Cream Needed: I’ll admit, I was skeptical about aquafaba mousse—until I tasted this. The chickpea brine whips up silky smooth, no heavy cream in sight, and holds its shape like a dream. (Yes, even my picky husband doesn’t question the ingredients.)
- Rich Without Guilt: That 70% dark chocolate and raw cacao powder? Pure, deep flavor without the sugar crash. The maple syrup balances it just enough to make this dessert feel like a treat, not a cheat. Honestly, I’ve made it for date nights and still eaten the whole bowl myself.
- Date Night or Meal Prep: Fancy dinner? Done. Lazy Sunday? Also done. This mousse takes 10 minutes to whip up and keeps for days in the fridge—perfect for when you want something impressive but don’t want to slave over it. (Between us, I’ve even packed it for work lunches. Don’t judge.)
- Pantry Magic on a Budget: Cacao butter and dark chocolate might sound fancy, but they stretch further than you’d think. A little goes a long way, and the aquafaba? That’s just a can of chickpeas you’d normally toss. I’ve made this for under $5 per serving—luxurious without the splurge.
Step-by-step instructions for cacao chocolate mousse
Here's the method that delivers that perfect balance of airy lightness and rich, fudgy pockets.
🍳 Step 1: Whip the Aquafaba to Stiff Peaks
In a clean, grease-free mixing bowl, combine the 1 cup Aquafaba (Chickpea Brine) and the 0.25 tsp Pinch Salt. Using a stand mixer fitted with the whisk attachment, beat on medium-high speed until soft peaks form—about 3-4 minutes. You'll know it's ready when you lift the whisk and the meringue holds its shape for a moment before slowly dissolving.
This is where the magic happens. The salt stabilizes the aquafaba, helping it hold its structure better. Don't rush this step—under-whipped aquafaba won't give you that silky texture you're after. If you don't have a stand mixer, a hand mixer works too, but you'll need to work it for about 5-6 minutes.
🍳 Step 2: Melt and Combine Chocolate and Cacao Butter
In a heatproof bowl set over a saucepan of simmering water (double boiler), combine the 6 oz Dark Chocolate (70% Cocoa), 4 oz Cacao Butter, and 0.25 cup Maple Syrup. Stir gently until the chocolate and cacao butter melt completely, creating a smooth, glossy mixture. Remove from heat and let cool slightly for 2-3 minutes—it should be warm but not hot to the touch.
Here's the thing—this step is crucial for that luxurious mouthfeel. The cacao butter adds richness and helps create those fudgy pockets in your otherwise light mousse. If you notice any graininess, strain the mixture through a fine-mesh sieve to ensure a silky texture. The mixture should coat the back of a spoon but still be pourable.
🥘 Step 3: Fold in Flavors and Achieve Perfect Texture
With the mixer on low speed, gradually add the melted chocolate mixture to the whipped aquafaba. Scrape down the sides of the bowl as needed to ensure everything incorporates evenly. Once combined, add the 1 tsp Vanilla Extract and 1 tsp Lemon Juice, mixing just until fully incorporated. The lemon juice brightens the flavors and balances the richness.
Now, gently fold in the 0.25 cup Coconut Milk (Full-Fat) if using, reserving a few tablespoons for later if needed. The mixture should be light and airy, with a ribbon-like consistency. If it's too thick, add a splash of the reserved coconut milk to loosen it. This is the moment that matters: you want the mousse to be thick enough to hold its shape but still light enough to create that signature airy texture.
🥘 Step 4: Chill and Set to Perfection
Divide the mousse evenly among 6 serving glasses or ramekins. Dust the tops generously with the 2 tbsp Unsweetened Cocoa Powder, pressing it lightly into the surface to create a beautiful, even layer. Cover each glass with plastic wrap and refrigerate for at least 4 hours, or until fully set and firm to the touch.
Real talk: patience is key here. The longer it chills, the more stable the texture becomes. If you're in a hurry, you can chill for 2 hours in the freezer, but bring it to room temperature before serving to prevent a watery texture. The mousse should hold its shape when gently shaken and have a slight wobble in the center—this is your sign of perfect doneness.
🍽️ Step 5: Serve with Fresh Berries and Enjoy
Just before serving, top each portion with 1/6 cup Fresh Berries**—raspberries or strawberries work beautifully. The acidity of the berries cuts through the richness of the mousse, creating a perfect balance of flavors. Serve immediately and watch as your guests are amazed by the contrast of silky lightness and hidden fudgy pockets in every bite.
This mousse is best enjoyed within 24 hours of making it, though it will keep in the refrigerator for up to 3 days. If you find yourself with leftovers, store them covered in the fridge and bring to room temperature before serving again. The texture might soften slightly after the initial chill, but a quick stir with a fork restores that perfect consistency.
Pro Tips For Making Cacao Chocolate Mousse
- Whisk Aquafaba Cold: I learned this the hard way—warm chickpea brine loses its magic. Whisk the aquafaba straight from the fridge, no heating needed. The cold protein holds together better when folded with melted chocolate, giving you that silky texture without deflating.
- Melt Chocolate Slowly: Dump dark chocolate into a double boiler and keep the heat at a simmer, not a boil. If you rush it, the cacao butter seizes up and creates grainy bits in your mousse—no amount of whisking fixes that. Patience here saves cleanup later.
- Sift the Cacao Powder: Raw cacao is lumpy, and lumps sink to the bottom of your mousse like tiny rocks. Sift it directly into your mixing bowl before adding the aquafaba. It blends smoother and distributes evenly—trust me, your spoon will thank you.
- Chill in Stages: Pour the mousse into ramekins, then pop them in the freezer for 10 minutes before transferring to the fridge. This quick shock sets the outer layer faster, so it doesn’t collapse when you open the door later. (Yes, even if you’re impatient like me.)
Dietary considerations for these flavors
Vegan-Friendly Base
Aquafaba replaces eggs perfectly, delivering that signature airy texture without dairy or animal products. The 1 cup of chickpea brine (strained from a 28 oz can) whips into stiff peaks just like egg whites, creating a stable foundation.
For extra richness, I add ¼ cup coconut milk—it’s optional but transforms the mousse into something truly luxurious. 🌱
Gluten-Free Adaptations
This recipe is naturally gluten-free since it relies on aquafaba, cacao, and maple syrup—no flour or grains involved. Double-check your dark chocolate and cacao powder labels to ensure they’re certified gluten-free (brands like Enjoy Life or Hu Kitchen are safe bets).
The only potential cross-contamination risk comes from shared kitchen tools, so clean your mixing bowl thoroughly if you’ve used gluten-containing ingredients recently.
Nut-Free Options
While cacao butter adds richness, you can swap it for vegan dark chocolate (melted) without sacrificing texture. Look for brands like Lindt 70% Dark or Ghirardelli that are nut-free.
If you’re avoiding all traces of nuts, also verify your cocoa powder is processed in a nut-free facility—some brands share equipment with nut products. The aquafaba and coconut milk remain entirely nut-free, so the base stays safe for nut allergies.
Lower Sugar Swaps
Reduce the ¼ cup maple syrup to 2 tbsp and add 1 tsp vanilla bean paste (instead of extract) for concentrated sweetness. For a sugar-free version, use monk fruit sweetener (like Lakanto)—start with 2 tbsp and adjust to taste, as it’s more potent.
The lemon juice helps balance any bitterness from reduced sweetness, so don’t skip it. These adjustments keep the mousse velvety while cutting sugar by up to 60%.
Allergen Awareness
This recipe is free from the top 9 allergens (dairy, eggs, nuts, wheat, soy, fish, shellfish, peanuts, sesame) when using certified ingredients. For soy concerns, ensure your vanilla extract is alcohol-based (some use soy lecithin as a stabilizer).
Always check labels on cacao powder and chocolate for hidden allergens—some brands process in facilities with soy or gluten. When in doubt, opt for single-ingredient brands like Navitas Organics** for cacao powder.
Nutrition facts
Frequently asked questions
Can I make this cacao mousse without aquafaba?
The aquafaba is key for that signature airy texture, but you can substitute with 1 block (14 oz) silken tofu blended with 1 tbsp cornstarch. Whip it until smooth, then proceed with the recipe. For extra stability, chill the mousse for 6 hours instead of 4. The result won't be exactly the same, but it'll still be delicious and creamy!
Why does my mousse look grainy?
Graininess usually means your chocolate didn't melt completely or was too hot when folded in. Always use a double boiler and strain the melted mixture through a fine-mesh sieve. Also, ensure your aquafaba is fully whipped to stiff peaks before folding—this creates a smoother base. If it's too late, a quick blend with an immersion blender can rescue it!
How do I get the fudgy pockets in my mousse?
Those pockets come from the cacao butter! Melt it with the chocolate and let it cool slightly before folding—it should be warm but not hot. For extra fudginess, add 1 tbsp melted vegan dark chocolate chips after the initial folding. The contrast between silky and fudgy happens when the mousse is properly chilled (4+ hours) but still slightly soft in the center.
Can I make this ahead of time?
This mousse actually tastes better after 24 hours in the fridge. Prepare it up to 3 days ahead—just store in airtight containers with parchment between layers. For serving, let it sit at room temperature for 30 minutes before plating. The texture might firm up slightly, so a quick stir with a fork restores that perfect ribbon consistency.
What's the best way to serve this?
For a restaurant-worthy presentation, use clear glassware (like coupe or martini glasses) and layer with fresh raspberries or strawberries. Dust with toasted cocoa powder (heat it in a dry pan for 2 minutes for deeper flavor) and add a sprinkle of crushed cacao nibs for crunch. Serve with a side of whipped coconut cream for extra decadence!