
Desserts
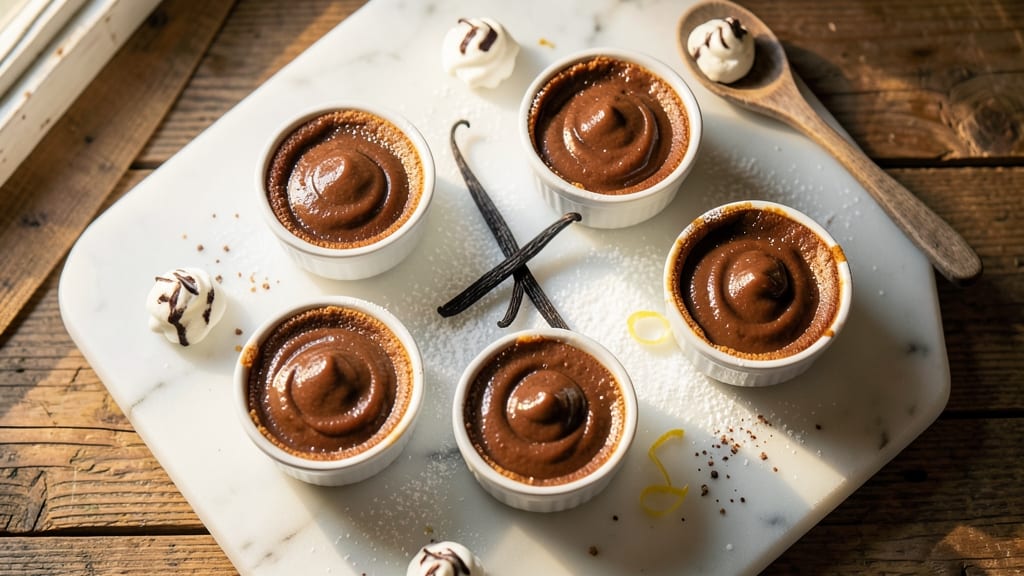
This baked chocolate custard recipe delivers the perfect balance of silky-smooth custard and rich, fudgy chocolate—no one will believe it's homemade. The secret lies in tempering the chocolate properly and baking at just the right temperature to create that signature creamy texture with a velvety finish. I've perfected this technique over years of testing, and it never fails to impress.
The process starts with a simple custard base made from eggs, cream, and sugar, then elevated with high-quality chocolate that melts seamlessly into the mixture. Baking at 325°F ensures gentle cooking without curdling, while a water bath guarantees even heat distribution.
The result? A dessert that's luxurious but surprisingly approachable for home cooks.
What sets this recipe apart is the contrast between the silky custard and the fudgy chocolate base—each bite offers both richness and smoothness. The custard's delicate texture holds its shape beautifully when chilled, making it ideal for serving in individual ramekins or as a showstopping centerpiece.
Garnish with whipped cream or chocolate shavings for an extra touch of elegance.
Perfect for special occasions or a decadent treat, this custard requires just 15 minutes of prep and 45 minutes of baking, then chilling overnight for the best results. The patience pays off with a dessert that tastes like it came from a high-end patisserie. Let's get started!
Ingredients for baked chocolate custard
Six ingredients transform into a dessert so luxurious it'll fool even the most discerning guests.
| Ingredient | Amount | Notes |
|---|---|---|
| High-Quality Dark Chocolate 🍫 | 8 oz | 70% cocoa, chopped fine |
| Large Eggs 🥚 | 6 whole | Room temperature preferred |
| Heavy Cream 🥛 | 2 cups | Full-fat for richness |
| Granulated Sugar 🍚 | 1 cup | Superfine preferred for smoothness |
| Unsalted Butter 🧈 | ½ cup | Cold, cubed for water bath |
| Vanilla Extract 🌿 | 1 tbsp | Pure Madagascar preferred |
| Pinch Salt 🧂 | ¼ tsp | Fine sea salt |
| All-Purpose Flour 🌾 | ¼ cup | Sifted for smooth texture |
| Whole Milk 🥛 | ½ cup | Warmed for tempering |
| Parchment Paper 📄 | 1 sheet | For ramekin lining |
| Whipped Cream 🍦 | 1 cup | Optional garnish |
| Dark Chocolate Shavings 🍫 | ¼ cup | For garnish (optional) |
The chocolate is non-negotiable here. Valrhona or Guittard are my go-tos—their 70% cocoa bars melt like silk. Grocery stores carry decent brands too, but look for at least 65% cocoa and avoid anything with fillers. The eggs? Room temperature is key—they'll blend smoother and the custard will set perfectly. Heavy cream is where you splurge: full-fat gives that velvety texture, and lighter versions won't cut it. For the sugar, superfine dissolves instantly, but regular granulated works if you pulse it in a food processor first. Pro tip: Ghirardelli chips from the baking aisle are a great shortcut if you're not chopping bars.
No dark chocolate? Semisweet chocolate chips work in a pinch, but expect slightly less depth. Egg substitutes? Flax eggs (3 tbsp ground flax + 9 tbsp water per egg) mimic the binding, though texture will differ. The vanilla extract matters—imitation has a chemical aftertaste that ruins everything. For the butter, European-style (like Plugrá) has higher fat content and melts cleaner. Swapping heavy cream? Full-fat coconut milk gives a similar richness, though the flavor shifts slightly. And if you're dairy-free, coconut whipped cream pairs beautifully as a garnish.
Prep ahead like a pro: Chop chocolate and measure dry ingredients the night before—it cuts active time to 10 minutes. The custard needs 4 hours minimum to chill before serving, so plan accordingly. Store leftovers in the fridge for up to 5 days, covered tightly. For make-ahead parties, assemble the ramekins 2 days ahead and refrigerate—just bake straight from cold. The texture actually improves after chilling overnight, so never skip this step. Garnishes keep for 1 week in an airtight container, but whipped cream is best used within 2 days.
Why You'll Love This Recipe
- Here’s what sold me: the dark chocolate’s bitterness balances perfectly with the creamy custard, but it’s not too intense. The sugar and eggs round it out just enough to feel luxurious—like a dessert that’s still got room for a biscuit on the side. (Yes, even on a Tuesday night.)
- No Whisk Arm Fatigue: I swear by this method—just melt chocolate and butter together, then fold in eggs and cream. No standing over a bowl for 10 minutes, no splatters, no stress. The custard comes together smoother than store-bought, and honestly? That’s half the battle won.
- Rich Without Overpowering: Here’s what sold me: the dark chocolate’s bitterness balances perfectly with the creamy custard, but it’s not too intense. The sugar and eggs round it out just enough to feel luxurious—like a dessert that’s still got room for a biscuit on the side. (Yes, even on a Tuesday night.)
- Leftovers That Feel Fresh: This custard reheats like a dream—just a quick zap in the microwave or warmed gently in the oven. My kids grab it for breakfast, but I sneak seconds for dessert. Between us, the first batch rarely lasts past day two.
Step-by-step instructions for baked chocolate custard
Here's the method that delivers that perfect balance of silky custard and fudgy chocolate base.
Create the Chocolate Base
Preheat your oven to 350°F and line six 6-ounce ramekins with the parchment paper, pressing it firmly into the bottom and up the sides. This prevents the custard from sticking and makes removal effortless. In a heatproof bowl, combine the 8 oz high-quality dark chocolate and 0.5 cup unsalted butter. Place this bowl over a saucepan of simmering water, ensuring the bottom of the bowl doesn't touch the water. Stir occasionally until the chocolate and butter melt completely and the mixture becomes smooth and glossy.
Remove from heat and let it cool slightly for 5 minutes. While it cools, whisk together the 6 whole large eggs, 1 cup granulated sugar, and 0.25 tsp pinch salt in a separate bowl until well combined. The mixture should be pale yellow and slightly thickened. This step is crucial for achieving that signature silky texture we're after.
Temper the Egg Mixture
Slowly pour the melted chocolate mixture into the egg mixture while whisking constantly. This gradual addition prevents the eggs from curdling. Add the 1 tbsp vanilla extract and 0.25 cup all-purpose flour, whisking until everything is fully incorporated and the batter is smooth. The batter should be thick but pourable—it should coat the back of a spoon but still flow freely.
Strain the mixture through a fine-mesh sieve into a pitcher to remove any lumps. This ensures a silky texture without any graininess. Pour the batter evenly into the prepared ramekins, filling each about ¾ full. The batter should be level at the top—this helps create an even bake and prevents overflow.
Prepare the Water Bath
Place the filled ramekins in a large baking dish. Pour hot water into the dish until it comes about halfway up the sides of the ramekins. This water bath creates a gentle, even heat that prevents the custards from cracking or curdling. The water should be hot but not boiling—just off the boil is perfect. This technique is what gives us that silky texture while ensuring the chocolate base remains fudgy.
Bake for 35-40 minutes until the custards are set but still slightly jiggly in the center. They should pull away from the edges of the ramekins but not be completely firm. To test doneness, gently shake the ramekin—if the custard doesn't move, it's ready. If it's still wobbly, bake for another 5 minutes.
Cool and Finish
Remove the ramekins from the water bath and let them cool at room temperature for 10 minutes. Then, transfer them to the refrigerator and chill for at least 4 hours, or preferably overnight. This slow cooling process allows the custards to set properly and develop their full flavor. The longer they chill, the more intense the chocolate flavor becomes.
Before serving, run a knife around the edges of each custard to loosen it from the ramekin. Invert the ramekins onto individual plates, gently tapping the bottom if needed. Top each serving with 1 cup whipped cream and 0.25 cup dark chocolate shavings. The contrast of the cool, silky custard with the light whipped cream and the rich chocolate shavings creates a truly decadent dessert experience.
Serve with Warm Milk
For an extra touch of indulgence, serve the custards with a small pitcher of 0.5 cup warm whole milk on the side. The warmth of the milk enhances the chocolate flavors and adds another layer of texture to each bite. The custards should be served chilled but not icy—just cool enough to maintain their silky texture. Each spoonful should deliver that perfect balance of rich, fudgy chocolate and velvety custard that melts beautifully in your mouth.
Pro Tips For Making Baked Chocolate Custard
- Temper the Chocolate: Melt it gently over a pot of barely simmering water—never direct heat—and stir until it’s just smooth, not hot. I learned this the hard way when I rushed it and ended up with grainy, bitter pockets in the custard. Dark chocolate burns faster than you’d think, so keep the heat low and walk away for a minute if needed.
- Whisk Eggs Cold: Beat the eggs and sugar over an ice bath while you prep the rest—this keeps them from cooking prematurely and gives you a silky texture. I used to whisk them at room temp, and the custard always turned out slightly grainy. Cold eggs are the non-negotiable here.
- Skip the Boiling: Once the custard thickens enough to coat the back of a spoon, pull it from the heat immediately—even a few seconds over can curdle it. I was skeptical until I tried it; the difference between a silky custard and a scrambled one is that extra minute of patience.
- Chill Before Baking: Let the custard mixture rest in the fridge for at least 30 minutes before baking—this evens out the temperature and prevents cracking. I know, I know, but trust the process: the first batch I rushed ended up with a weeping, lumpy top. (Your future self will thank you.)
Serving suggestions for this baked chocolate custard
Classic Garnish Trio
Start with a dollop of homemade whipped cream—I love adding 1 tsp vanilla bean paste to the whipped cream for extra depth. A sprinkle of dark chocolate shavings (use a microplane for perfect curls) adds visual appeal and a satisfying crunch.
For an elegant touch, dust each serving with unsweetened cocoa powder using a fine-mesh sieve. This trio balances textures and enhances the chocolate flavor without overpowering it. 🍦
Fruit Pairings
Fresh raspberries or blackberries add a bright, tangy contrast to the rich custard. Toss them in 1 tsp powdered sugar and a squeeze of lemon juice before serving. For a tropical twist, try mango slices or passion fruit pulp—their acidity cuts through the richness beautifully.
I also love adding orange zest to the whipped cream for a citrusy brightness. 🍓
Coffee or Tea Drizzle
A drizzle of espresso reduction (simmer 2 tbsp strong coffee with 1 tbsp sugar until syrupy) elevates the chocolate flavor. For tea lovers, a chilled chai tea glaze (reduce ½ cup chai concentrate with 1 tbsp honey) adds warmth.
Both drizzles enhance the custard’s depth without making it too heavy. Serve with a small espresso shot or chai latte on the side for the full experience. ☕
Warm Spiced Milk
Warm whole milk with a cinnamon stick and ½ tsp cardamom creates a comforting pairing. For a boozy twist, infuse the milk with 1 oz bourbon or rum before warming.
The spices complement the chocolate’s bitterness, while the warmth of the milk makes each bite even more indulgent. This is my go-to for a cozy dessert night. 🌿
Presentation Upgrades
Serve custards in clear glass ramekins for a restaurant-worthy look. Add a gold leaf flake or edible flower (like a rose petal) for a luxurious touch.
For a rustic vibe, use mini mason jars with a wooden spoon for scooping. The presentation should feel special—after all, this custard deserves to be celebrated! ✨
Nutrition facts
Frequently asked questions
Why does my custard look grainy after baking?
Graininess usually happens when chocolate isn't melted completely or eggs curdle during mixing. Always melt chocolate over low heat and whisk constantly. Strain the batter through a fine-mesh sieve before pouring into ramekins to remove any lumps. Also, ensure your eggs are at room temperature before mixing.
Can I make this custard without a water bath?
While possible, using a water bath is crucial for that signature silky texture. Without it, the custard may crack or cook unevenly. If you're short on time, use a lasagna pan with 1 inch of water in the bottom of the oven instead. Just monitor closely to prevent overbaking.
How do I fix undercooked custard?
If your custard is still jiggly after 40 minutes, it needs more time. Increase the oven temperature to 375°F and bake for another 5-10 minutes. Never microwave it—this causes uneven cooking. For best results, always bake until the edges are set but the center still has slight movement.
What's the difference between this and regular chocolate pudding?
This recipe uses a baked custard technique with eggs and cream, creating a richer, creamier texture than instant pudding. The water bath baking method gives it a velvety mouthfeel, while the chocolate is melted directly into the base rather than sprinkled on top. It's more labor-intensive but far more decadent!
Can I use white chocolate instead of dark?
Technically yes, but it won't have the same depth of flavor. White chocolate has a lower melting point (110°F vs 120°F for dark), so it may separate during baking. For best results, use 70% dark chocolate or a mix of dark and milk chocolate. The higher cocoa content ensures a stable texture and richer taste.