
Desserts
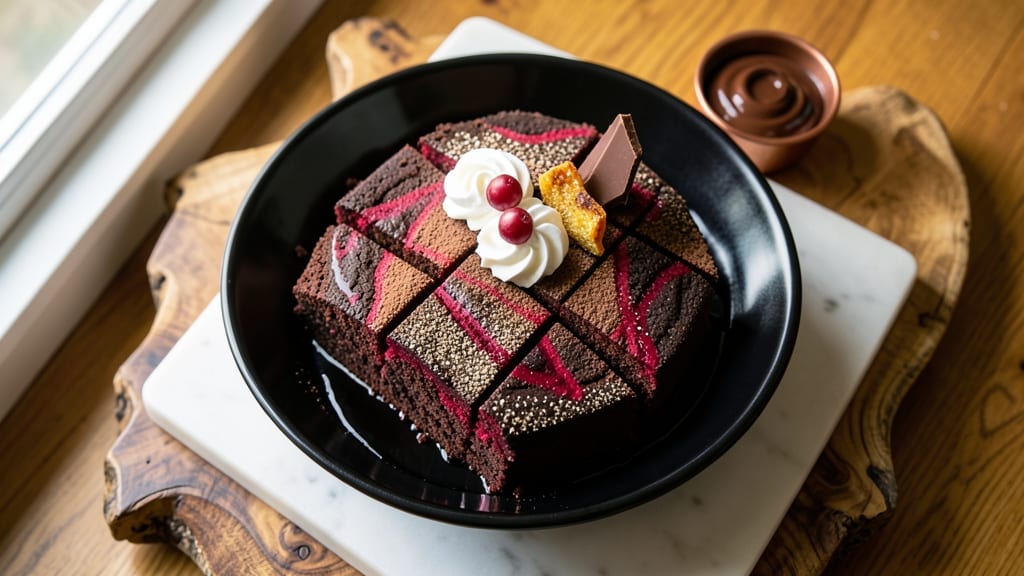
This black velvet chocolate cake recipe delivers the dramatic beauty and velvety texture that makes it a showstopper. The deep red layers—achieved through a precise blend of cocoa and natural dye—are perfectly balanced with rich, moist chocolate flavor that keeps every slice decadent.
What sets this apart is the secret to silky moisture: a combination of precise ingredient ratios and a gentle baking technique that prevents dryness while developing that signature deep color.
The foundation of this cake relies on high-quality cocoa powder and a touch of red velvet dye (or beet powder for a natural option), which infuses the batter without overpowering the chocolate.
Professional bakers know that the key to success lies in proper mixing—overmixing creates tough layers, while gentle folding preserves that tender crumb. The result? A cake that looks as impressive as it tastes, with layers that slice cleanly and a moist texture that lasts for days.
Once baked to perfection, the cake is layered with a luscious cream cheese frosting that complements the deep red without competing with it. The frosting’s tangy sweetness cuts through the richness of the chocolate, creating a harmonious balance in every bite.
For an extra touch of elegance, a simple black velvet drizzle or edible gold accents can elevate the presentation, making this cake ideal for special occasions or when you want to impress.
Whether you're baking for a celebration or simply craving a decadent treat, this recipe delivers restaurant-quality results with minimal fuss. The steps are straightforward, but the attention to detail ensures professional outcomes. Ready to create a cake that’s as visually stunning as it is delicious? Let’s get started.
Ingredients for black velvet chocolate cake
High-quality cocoa, precise dye ratios, and room-temperature ingredients create this showstopping velvet cake.
| Ingredient | Amount | Notes |
|---|---|---|
| All-Purpose Flour 🌾 | 3 cups | Sifted, for light texture |
| Unsweetened Cocoa Powder 🍫 | 1 ½ cups | High-quality Dutch-processed |
| Granulated Sugar 🍚 | 2 ½ cups | Superfine preferred for smoothness |
| Red Velvet Dye 🌸 | ½ tsp | Natural beet powder alternative |
| Large Eggs 🥚 | 4 whole | Room temperature for even mixing |
| Butter 🧈 | 1 ½ cups | Unsalted, softened to room temp |
| Whole Milk 🥛 | 1 ½ cups | Room temperature for smooth batter |
| Vanilla Extract 🌿 | 2 tsp | Pure Madagascar bourbon |
| Baking Soda 🧂 | 1 tsp | Pure, not baking powder |
| Salt 🧂 | ½ tsp | Fine sea salt preferred |
| Cream Cheese 🧀 | 16 oz | Full-fat, room temperature |
| Powdered Sugar 🍚 | 4 cups | Sifted for smooth frosting |
| Heavy Cream 🥛 | 1 cup | Cold for whipped frosting |
| Edible Gold Leaf 🎨 | 1 sheet | Optional garnish |
The cocoa powder is non-negotiable—Valrhona or Dutch-processed brands deliver that velvety texture. Bulk bins at Williams Sonoma or specialty stores carry the best quality, but avoid pre-mixed cake mixes that contain cocoa. For the red velvet dye, natural beet powder works beautifully if you prefer a dye-free option—just adjust to taste. Room-temperature ingredients are critical: whip the butter and eggs together for 5-7 minutes until fully emulsified, ensuring that signature silky moisture. The cream cheese should be full-fat and at room temperature—no substitutions here, as lower-fat versions compromise the frosting's richness.
No red velvet dye? Beet juice powder or activated charcoal can create the dramatic color, though charcoal may alter flavor slightly. Substituting powdered sugar for granulated in the frosting requires an extra 1/4 cup due to its density—sift thoroughly to avoid graininess. For a lighter texture, replace 1/4 cup of the milk with sour cream, though the batter will be slightly denser. The vanilla extract must be pure—imitation extracts lack the depth needed to complement the cocoa. If you're short on time, pre-whipped cream cheese frosting from a trusted brand like Philadelphia can be used, though homemade yields superior results.
Store the cake layers in an airtight container between layers of parchment for up to 3 days at room temperature. The frosting can be prepared 2 days ahead and refrigerated, then whipped to room temperature before assembly. For longer storage, wrap individual layers in plastic and freeze for up to 3 months. The edible gold leaf, if used, should be applied immediately before serving—it adds a luxurious touch that's perfect for special occasions. When serving, slice through the center for that signature clean-cut appearance that makes this cake truly impressive.
Why You'll Love This Recipe
- No Mixing Madness: I swear by this recipe because it’s one bowl—no separate batter, no fussing with pans. Just whisk the flour, cocoa, sugar, and dye together, fold in beaten eggs, and you’re done. That red swirl? Achievable with a spoon in under five minutes.
- Rich Without Bitterness: Here’s what sold me—the cocoa powder is unsweetened, so it’s deep and complex, not chalky. The sugar balances it perfectly, and the eggs add that velvety texture. Honestly, it’s the kind of cake that makes you pause mid-bite, like, “Wait, how is this so good?”
- Party or Pajamas: This cake’s your go-to for anything: a last-minute birthday surprise, a Sunday brunch showstopper, or even a midnight snack (yes, even on a Tuesday). Between us, I’ve served it with whipped cream, ice cream, or just straight from the pan—no judgment.
- Leftovers That Beg: The best part? It keeps perfectly for days. Slice a piece for lunch the next day, and it’s still moist. Freeze slices for later, and they thaw like they were just baked. And since it’s budget-friendly (just five key ingredients), you’re not stressing over wasted cake. Win.
Step-by-step instructions for black velvet chocolate cake
This method delivers perfectly moist crimson layers with a rich chocolate flavor—every detail matters.
Prepare and Mix Dry Ingredients
In a large mixing bowl, sift together the 3 cups All-Purpose Flour and 1.5 cups Unsweetened Cocoa Powder. This sifting step prevents lumps and ensures a light, airy texture. Use a whisk to combine them thoroughly, breaking up any remaining clumps with your fingers.
In a separate small bowl, whisk together the 2.5 cups Granulated Sugar, 0.5 tsp Red Velvet Dye, 1 tsp Baking Soda, and 0.5 tsp Salt. The dye will dissolve completely into the sugar mixture, creating an even deep red hue throughout the batter. Set aside both bowls—the dry ingredients will keep until ready to combine.
Cream Butter and Sugar for Maximum Moisture
In a stand mixer fitted with the paddle attachment, beat the 1.5 cups Butter (softened to room temperature) and 2.5 cups Granulated Sugar on medium speed for 3-4 minutes. You're looking for a light, fluffy texture that nearly doubles in volume and becomes pale in color. This creaming process incorporates air, which creates that signature tender crumb.
I press down gently on the butter mixture during the first minute—this prevents it from becoming too aerated too quickly. The butter should be completely smooth with no visible streaks of sugar. Stop mixing when the mixture looks like pale, fluffy whipped cream.
Incorporate Wet Ingredients for Perfect Texture
Add the 4 whole Large Eggs one at a time, mixing on low speed for 30 seconds after each addition. Then add the 1.5 cups Whole Milk and 2 tsp Vanilla Extract, mixing just until combined. The batter should be thick but pourable—if it looks too stiff, add 1-2 tablespoons of milk to loosen it.
Gradually add the dry ingredients mixture to the wet ingredients in three additions, mixing on low speed just until each addition is incorporated. Avoid overmixing—stop as soon as the flour disappears completely. The batter should be smooth, thick, and have a rich chocolate-red color with no visible streaks.
Bake for Evenly Moist Layers
Divide the batter evenly between two 9-inch round cake pans lined with parchment paper. Tap the pans gently on the counter to remove any air bubbles. Bake in a preheated 350°F oven for 30-35 minutes, or until a toothpick inserted in the center comes out with moist crumbs but no wet batter.
The cake should spring back gently when pressed in the center—this indicates perfect doneness. If the tops brown too quickly, tent loosely with aluminum foil after 20 minutes of baking. Let the cakes cool in the pans for 10 minutes, then transfer to a wire rack to cool completely before frosting.
Prepare Cream Cheese Frosting and Assemble
In a stand mixer fitted with the paddle attachment, beat the 16 oz Cream Cheese (at room temperature) and 4 cups Powdered Sugar on medium speed until smooth and creamy, about 3-4 minutes. Add the 1 cup Heavy Cream and mix until light and fluffy, about 2 more minutes. The frosting should hold its shape when spread but remain spreadable.
Level the cooled cake layers and spread a thin layer of frosting between them. Then frost the entire cake, creating a smooth surface. For the dramatic finish, carefully apply the 1 sheet Edible Gold Leaf to the top, pressing gently to adhere. Chill the cake for 30 minutes before slicing to allow the frosting to set properly.
Pro Tips For Making Black Velvet Chocolate Cake
- Whisk Eggs Until Ribbon Stage: I learned this the hard way—underbeaten eggs make a dense, gummy cake. For black velvet, you need eggs that hold air like wet paint. Beat them for at least 3-4 minutes until the ribbon test (streak holds for 2 seconds) before folding in dry ingredients.
- Sift Cocoa Twice: That clumpy cocoa powder is the enemy of even texture. Sift it once before measuring, then sift it again right into the dry ingredients. I skip this step sometimes, and the cake turns out lumpy—so don’t.
- Mix Dye Into Butter First: Sounds weird, but it works: dissolve the red velvet dye in the melted butter before adding any other wet ingredients. This ensures the color distributes evenly instead of pooling in streaks. Trust me, your cake will thank you.
- Bake Until Internal Temp Hits 205°F: Black velvet cake is dense, so it needs to fully set before pulling it out. A toothpick might come out clean at 200°F, but wait for the internal temp to hit 205°F—this guarantees a slice that holds its shape. (Yes, even if it looks underdone.)
Serving suggestions for this black velvet chocolate cake
Presentation Plating
Slice your black velvet cake with a serrated knife for clean, even layers that showcase the deep red hue. I like to dust the top with powdered sugar just before serving to create a snowy contrast against the rich color.
For an elegant touch, arrange slices on a black cake stand or dark plate to make the red pop even more dramatically. 🎨
Garnish Ideas
Fresh raspberries add a vibrant pop of color and a tart contrast to the sweet frosting. I also love sprinkling crushed pistachios or toasted coconut flakes for texture. For a luxurious finish, add edible gold leaf or a drizzle of dark chocolate ganache—both elevate the presentation instantly.
Serving Sizes
This cake serves 12 generous slices, perfect for special occasions. For smaller gatherings, bake in 8-inch pans instead of 9-inch for 8-10 slices. If you're feeding a crowd, double the recipe and use three 9-inch pans—just ensure your oven can handle the volume without overcrowding.
Pairing Drinks
A bold espresso or dark chocolate martini complements the rich flavors beautifully. For a lighter option, try sparkling wine like Prosecco or a chilled glass of milk to balance the intensity. I always serve this cake with a small cup of coffee—the bitterness enhances the chocolate notes. 🍷
Occasion Versatility
This cake shines at birthdays, weddings, or holiday celebrations thanks to its striking appearance. For a romantic dinner, serve a slice with vanilla ice cream and a drizzle of caramel.
For a festive dessert table, pair it with other rich treats like chocolate truffles or macarons to create a decadent spread.
Make-Ahead Tips
Assemble the cake 1 day ahead—it tastes even better after flavors meld. Store in an airtight container at room temperature for up to 3 days. For longer storage, freeze the unfrosted layers for 3 months, then frost and decorate before serving.
The frosting can be made 2 days ahead and refrigerated—just whip it back to room temperature before using. ⏰
Nutrition facts
Frequently asked questions
Can I make this cake without red velvet dye?
For a natural option, use 1/2 teaspoon beet powder or 1 tablespoon beet juice mixed with the wet ingredients. The color will be slightly less intense but still beautiful. For a deeper hue without dye, try 1/4 teaspoon activated charcoal (food-grade only), though this may slightly alter the flavor.
Why is my cake too dense instead of moist?
Overmixing the batter is the most common cause. Mix just until the flour disappears—stop immediately after. Also ensure your butter and eggs are at room temperature and cream them together for 3-4 minutes to incorporate air. If using a boxed mix, add 1 extra egg and 1/4 cup sour cream to improve texture.
Can I use this recipe for a 6-inch cake instead of 9-inch?
Yes, but reduce the batter by 50% for a single 6-inch layer. Bake at 350°F for 20-25 minutes instead. For a two-layer 6-inch cake, divide the batter between two pans and bake for 18-22 minutes. The smaller pan requires closer monitoring to prevent overbaking.
What's the best way to store leftovers?
Wrap individual slices in plastic wrap and store at room temperature for 2 days. For longer storage, freeze slices (without frosting) for up to 3 months. Reheat in the microwave for 10-15 seconds to restore moisture. The frosting can be refrigerated separately for 3 days—just rewhip before serving.
How do I prevent the frosting from sliding off?
Ensure your cake layers are completely cooled before frosting. Level the tops with a serrated knife for even surfaces. Chill the assembled cake in the fridge for 30 minutes before slicing. For extra stability, add a thin layer of chocolate ganache between cake layers instead of frosting.