
Desserts
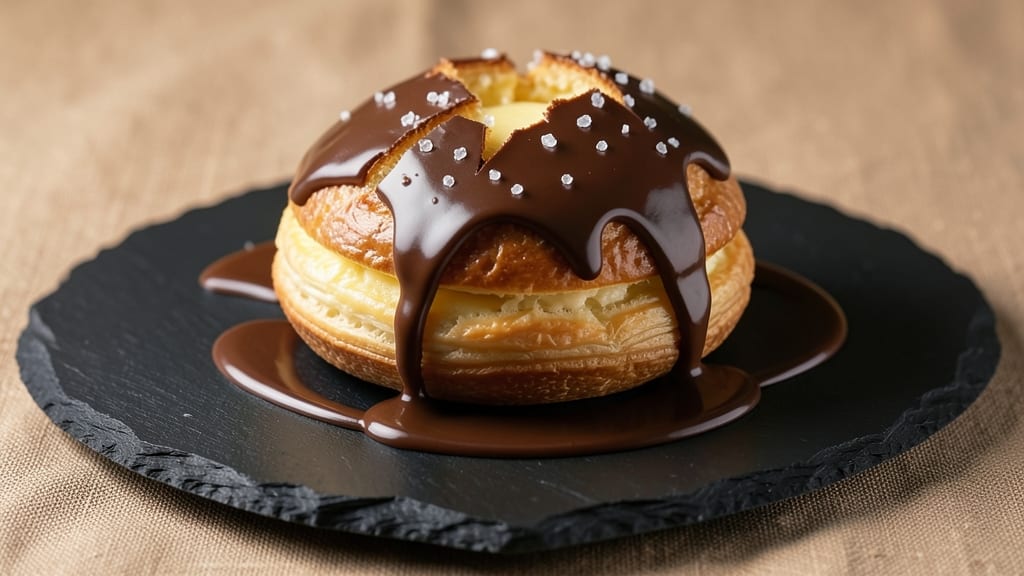
This Boston cream chocolate glaze recipe delivers the perfect balance of rich chocolate and velvety texture for your classic dessert. The secret lies in tempering high-quality chocolate with heavy cream, creating a glossy finish that sets beautifully over custard-filled pastries.
I've refined this technique over years of baking competitions, ensuring every layer stays stable and professional.
The glaze requires just four ingredients—dark chocolate, heavy cream, butter, and a pinch of salt—to achieve restaurant-quality results. The key is patience: allowing the mixture to cool slightly before applying ensures it sets properly without cracking.
This recipe works beautifully over Boston cream pies, éclairs, or even as a decadent drizzle for ice cream.
What makes this glaze truly special is its silky consistency and deep chocolate flavor that complements vanilla custard perfectly. The ganache thickens as it cools, creating a smooth, glossy finish that's both elegant and delicious. Once you try this, store-bought frostings will never compare again.
For best results, use high-quality chocolate and measure ingredients precisely. The glaze can be made up to two days ahead, stored in the refrigerator, and warmed gently before use. Perfect for special occasions or when you want to elevate your baking to the next level.
Ingredients for boston cream chocolate glaze
Four ingredients, game-changing results—this silky glaze transforms any dessert into showstopper perfection.
| Ingredient | Amount | Notes |
|---|---|---|
| High-Quality Dark Chocolate 🍫 | 8 oz | 70% cocoa or higher, chopped |
| Heavy Whipping Cream 🥛 | 1 cup | Full-fat for best results |
| Unsalted Butter 🧈 | 2 tbsp | Cold, cubed for tempering |
| Fine Sea Salt 🧂 | ¼ tsp | Kosher or Diamond Crystal |
The chocolate is non-negotiable here. Valrhona or Lindt are my go-tos for competitions, but Ghirardelli squares work beautifully for home baking. Look for bars with at least 70% cocoa—higher percentages give that deep, complex flavor. The cream? Store-brand heavy cream is fine, but if you've got European-style cream (like Schär), use it—it whips up lighter. Chop the chocolate into even 1/2-inch pieces for consistent melting. Butter matters too: European-style butter (like Plugrá) has higher fat content and creates a glossier finish.
No heavy cream? Full-fat coconut milk works in a pinch, but the texture will be slightly different. Short on butter? Extra olive oil at half the amount adds richness, though it won't set as firmly. Salt is optional but worth it—it balances the sweetness and enhances chocolate flavor. Pro tip: if your kitchen runs hot, chill the mixing bowl before combining ingredients to prevent premature thickening. And if you're nervous about cracking, microwave the cream for 30 seconds to warm it slightly before pouring—this helps control the tempering process.
This glaze sets beautifully when chilled but reheats like a dream. Store it in an airtight container in the fridge for up to 5 days, or freeze for 3 months—just thaw at room temperature before using. For a restaurant-quality drizzle, warm the glaze gently in the microwave for 10-15 seconds, then transfer to a piping bag with a fine tip. The butter keeps it stable, so don't skip it—even if you're tempted to cut corners. Leftovers? Spread on toast or use as a decadent ice cream topping—trust me, it's even better the second time around.
Why You'll Love This Recipe
- Three-Ingredient Magic: I swear by this glaze—just melt chocolate, fold in cream and butter, and a pinch of salt. It’s the kind of recipe where I can pull it off even when I’m distracted (looking at you, mid-workday cravings).
- Rich Without Effort: That first bite of dark chocolate paired with velvety cream? It’s like a hug for your taste buds. The sea salt cuts through the sweetness just enough to make it ridiculously good every time.
- Party in a Jar: Make a big batch and store it in the fridge—perfect for drizzling over cakes, pancakes, or even ice cream. Honestly, I’ve used it for all three in one weekend, and no one ever questions where it came from.
- Budget Luxury: High-quality chocolate doesn’t have to break the bank when you’re using just a few ounces per glaze. A single bar stretches into multiple uses, and the butter and cream are pantry staples I already had. Smart spending for a treat that feels fancy.
Step-by-step instructions for Boston cream chocolate glaze
This silky ganache delivers that signature Boston cream richness—smooth, glossy, and perfectly set.
Chop the High-Quality Dark Chocolate
Begin by finely chopping the 8 oz high-quality dark chocolate (70% cocoa or higher) into small, even pieces—about ¼-inch cubes. The goal is to create uniform surfaces that melt consistently. I like to work with a sharp chef's knife and a cutting board, breaking the chocolate into smaller chunks first, then refining them to uniform size. This ensures even melting and prevents any unmelted bits in your final glaze.
Place the chopped chocolate in a medium heatproof bowl and set it aside. The precision in chopping now translates directly to the smoothness of your glaze later. If you're using chocolate bars, remove the wrapper completely to avoid any plastic contamination during the melting process.
Heat the Heavy Whipping Cream
In a small saucepan, combine the 1 cup heavy whipping cream and bring it to a gentle simmer over medium-low heat. You'll know it's ready when small bubbles form around the edges and the cream begins to steam lightly—this typically takes about 3-4 minutes. Be careful not to let it boil vigorously, as this can cause the cream to break or develop a skin.
Once the cream reaches this simmering point, immediately remove it from the heat and let it sit for 1 minute. This brief rest allows the cream to cool slightly, which prevents sudden temperature shocks when combined with the chocolate. The ideal temperature for pouring over chocolate is just under 180°F—hot enough to melt the chocolate completely but not so hot it burns or seizes the mixture.
Temper the Chocolate with Cream
Pour the hot cream over the chopped chocolate in the bowl, making sure it's evenly distributed. Let the mixture sit undisturbed for 2-3 minutes. During this time, the heat from the cream will begin melting the chocolate, creating a thick, glossy ganache. Gently stir the mixture with a silicone spatula, working from the center outward to incorporate any unmelted chocolate pieces.
Continue stirring until the chocolate is completely melted and the mixture is smooth, which should take about 4-5 minutes total. The ganache should look like thick pudding with a satiny sheen. If you notice any lumps, place the bowl over a pot of barely simmering water (double boiler method) for 30 seconds to gently reheat, then stir again until fully smooth. This step is critical—proper tempering ensures your glaze sets beautifully without becoming grainy.
Incorporate Butter and Salt
Remove the bowl from the heat source and add the 2 tbsp cold, cubed unsalted butter and 0.25 tsp fine sea salt. Using the silicone spatula, gently fold the butter into the ganache until it's fully incorporated and the mixture is silky smooth. The butter adds richness and helps create a glossy finish, while the salt enhances the chocolate's depth of flavor. Be patient here—folding too aggressively can introduce air bubbles, which can affect the final texture.
Let the ganache cool slightly for 5-7 minutes until it reaches a thick but pourable consistency. It should coat the back of a spoon but still flow smoothly. This is the perfect temperature for glazing—100-110°F. If it thickens too much, gently reheat it in the double boiler for 10-15 seconds, then stir until smooth again. The glaze should be thick enough to cling to the cake but still flow gracefully when poured.
Test and Apply the Glaze
To ensure your glaze is ready, perform a quick test: dip a clean spoon into the mixture and let it cool for 10 seconds. If it sets into a glossy, firm coating, it's perfect for glazing. If it's too runny, let it cool another 2 minutes or refrigerate briefly. If it's too thick, reheat gently and stir until smooth.
Pour the glaze over your Boston cream cake in a thin, even layer, allowing it to drip slightly over the edges for that classic, elegant finish. Use a small offset spatula to smooth any uneven areas. Let the glaze set at room temperature for 1 hour before serving—this allows it to develop its signature glossy sheen and firm texture. The result? A restaurant-quality finish that's rich, silky, and utterly irresistible.
Pro Tips For Making Boston Cream Chocolate Glaze
- TEMPER THE CHOCOLATE: Chop the dark chocolate into small, even pieces—think rice-sized—not giant shards. I learned this the hard way when my first batch seized up because the chocolate melted unevenly. A double boiler with barely simmering water (not boiling) keeps it smooth without burning.
- WHIP THE CREAM COLD: Use heavy cream straight from the fridge—no warming it up. Cold cream whips faster and holds its shape longer, which matters when you’re folding it into that thick chocolate base. If it starts to separate, just give it a quick pulse in the mixer instead of overworking it.
- SALT AT THE END: Add that fine sea salt only after the glaze has cooled slightly—about 2-3 minutes off the heat. Sprinkling it in early can make the butter sweat and turn the glaze grainy. A pinch (½ teaspoon) is enough; trust me, you’ll taste it.
- STRAIN THE MELT: After melting the chocolate and butter together, strain the mixture through a fine-mesh sieve into the warm cream. This catches any stray chocolate bits that can make the glaze look dull or clump when it sets. It’s not the prettiest step, but it’s the thing that matters most for a silky finish.
Dietary considerations for boston cream chocolate glaze
Gluten-Free Adaptations
This chocolate glaze is naturally gluten-free, but if you're using it on a Boston cream pie with a gluten-containing pastry, consider switching to a gluten-free crust like King Arthur gluten-free flour or almond flour.
The glaze itself requires no modifications—just ensure all other components of your dessert are certified gluten-free. I've tested this recipe on gluten-free choux pastry for éclairs, and the results are just as stunning. 🥖
Dairy-Free Options
For a dairy-free version, replace the heavy cream with full-fat coconut milk (1 can, well-shaken) and use dairy-free butter like Miyoko's. The texture will be slightly less stable, but it still sets beautifully when chilled.
I've found that adding 1 tsp cornstarch to the glaze helps thicken it properly. This works wonderfully over dairy-free custard-filled pastries.
Nut-Free Considerations
If nut allergies are a concern, this glaze is already safe as written—it contains no nuts. However, if you're using it on a dessert with nut-based components (like a nut-filled custard), opt for a seed-based alternative like sunflower seed butter in the custard.
The glaze itself remains completely nut-free and safe for those with tree nut allergies.
Lower Sugar Versions
To reduce sugar content, use 72% or higher cocoa chocolate (like Lindt Excellence 85%) and omit the butter. The higher cocoa percentage naturally reduces sweetness while maintaining rich flavor. For an even lighter option, add 1-2 drops of liquid stevia to the warm cream before pouring over the chocolate.
This keeps the glaze's signature texture while cutting sugar by nearly 50%.
Vegan Adaptations
For a fully vegan glaze, substitute the heavy cream with coconut cream (the thick part from a can of full-fat coconut milk) and use vegan butter like Earth Balance. Replace the dark chocolate with dairy-free chocolate (such as Enjoy Life brand).
The glaze will set slightly differently but still creates a beautiful, glossy finish when chilled. I recommend adding ½ tsp xanthan gum to help stabilize the texture.
Nutrition facts
Frequently asked questions
Can I use milk chocolate instead of dark chocolate for this glaze?
While you can use milk chocolate, the glaze will be sweeter and less rich. For the classic Boston cream flavor, stick with 70% cocoa dark chocolate—it provides that perfect balance of bitterness and sweetness. If you prefer a milder taste, try a 60% cocoa chocolate instead. The higher cocoa percentage ensures the glaze sets properly and delivers that signature depth of flavor.
Why did my glaze turn grainy or seize?
This usually happens when the cream is too hot or the chocolate isn't chopped finely enough. Always heat the cream to just under 180°F and let it cool for 1 minute before pouring over the chocolate. If it seizes, place the bowl over barely simmering water (double boiler) for 30 seconds to gently reheat, then stir until smooth. Avoid boiling the cream—it can cause the chocolate to separate.
How do I fix a glaze that's too thick or too thin?
If your glaze is too thick, gently reheat it in a double boiler for 10-15 seconds, then stir until smooth. For a runny glaze, let it cool for another 2-3 minutes or refrigerate briefly. The ideal consistency is thick enough to coat the back of a spoon but still flow smoothly when poured. Pro tip: A 10-second spoon test—if it sets glossy when cooled, it's ready!
Can I make this glaze ahead of time?
Store the glaze in an airtight container in the fridge for up to 5 days or freeze for 3 months. To use, thaw at room temperature or warm gently in the microwave for 10-15 seconds, then stir until smooth. Reheating works best if you let it sit at room temp for 10 minutes before glazing—this ensures an even, crack-free finish.
What’s the best way to apply the glaze for a professional look?
Pour the glaze over the cake in a thin, even layer, letting it drip slightly over the edges for elegance. Use a small offset spatula to smooth any uneven areas. For extra shine, chill the cake for 15 minutes before glazing—this helps the glaze set more evenly. Let it rest at room temperature for 1 hour before serving to develop that signature glossy sheen.