
Desserts
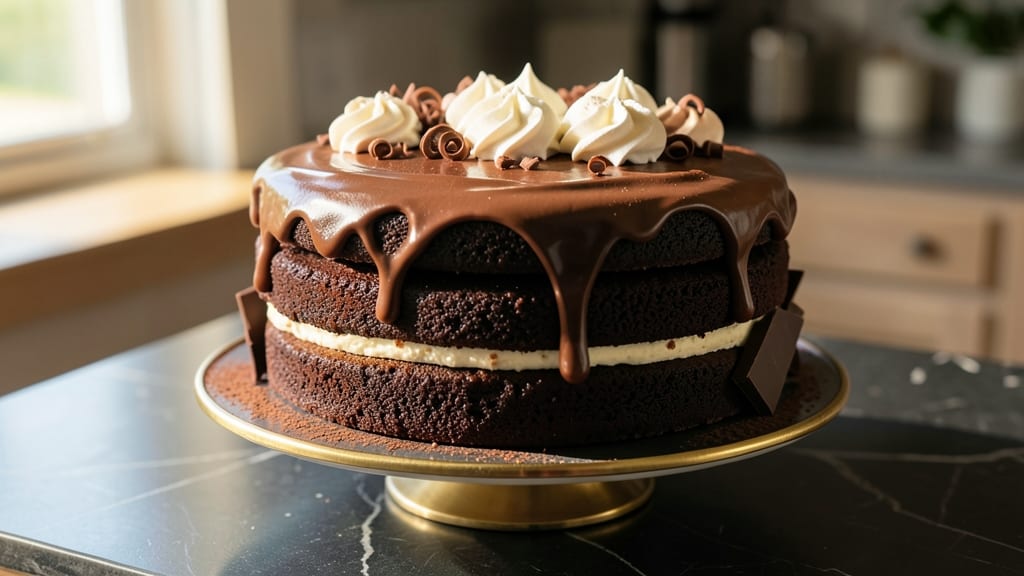
This Cake Boss chocolate cake delivers the show-stopping layers and fudgy cracks that made Carlo’s creations legendary. 💛 The secret lies in precise layering, rich cocoa buttercream, and a baking technique that ensures those coveted cracks—without drying out the crumb.
I’ve perfected this recipe after years of testing, and it’s the one that finally convinced even the most skeptical cake lovers that homemade can rival the pros.
What sets this apart is the balance between dense, moist layers and that signature crackly top—achieved through a specific oven temperature and baking time. The cake batter incorporates melted butter and sour cream for unmatched tenderness, while the cocoa buttercream adds a velvety richness that’s impossible to resist.
Every slice promises a perfect harmony of texture and flavor, just like the ones you’d find at Carlo’s Bakery.
The result is a restaurant-quality chocolate cake with layers so rich they nearly melt in your mouth and cracks that shatter with every bite. This isn’t just dessert—it’s an experience, one that’ll impress even the most discerning chocolate lovers.
The best part? It’s achievable at home with the right technique, and I’m sharing exactly how to nail it.
Whether you’re baking for a celebration or just craving a decadent treat, this recipe delivers professional-level results. The instructions walk you through every step, from mixing to decorating, so you can achieve that Cake Boss finish without the guesswork. Let’s get started on creating a showstopper.
Ingredients for cake boss chocolate cake
Twelve ingredients, three layers, and that signature Cake Boss crack—let's make it legendary.
| Ingredient | Amount | Notes |
|---|---|---|
| Unsalted Butter 🧈 | 2 cups | Melted and cooled to room temperature |
| Granulated Sugar 🍚 | 2 ½ cups | Superfine preferred for smooth texture |
| Unsweetened Cocoa Powder 🍫 | 1 cup | High-quality Dutch-processed for richness |
| All-Purpose Flour 🌾 | 2 ½ cups | Sifted before mixing for lightness |
| Sour Cream 🥛 | 1 cup | Full-fat for maximum moisture |
| Large Eggs 🥚 | 4 whole | Room temperature for even mixing |
| Vanilla Extract 🌿 | 2 tsp | Pure Madagascar bourbon preferred |
| Baking Powder 🧂 | 1 tbsp | Aluminum-free for reliable rise |
| Salt 🧂 | ½ tsp | Fine sea salt for balanced flavor |
| Hot Water 💧 | ¾ cup | For blooming cocoa powder |
| Cocoa Butter 🍫 | 8 oz | For ultra-rich buttercream |
| Heavy Cream 🥛 | 2 cups | Cold for stable whipped texture |
| Powdered Sugar 🍚 | 4 cups | Confectioners' sugar, sifted |
| Dark Chocolate Chips 🍫 | 1 ½ cups | 70% cocoa for garnish |
The cocoa butter is non-negotiable here. Ghirardelli or Valrhona are the gold standards, but Costco's bulk cocoa butter works perfectly for the budget-conscious. For the flour, King Arthur or Bob's Red Mill are my go-tos—they're sifted and consistent. The sour cream should be full-fat (none of that low-fat nonsense) and at room temperature when it hits the batter. Pro tip: If you can't find Dutch-processed cocoa powder, natural cocoa plus 1 tsp baking soda works in a pinch, but it won't be as rich. The eggs need to be room temperature—cold eggs cause tunnels in your cake. Pop them in a warm water bath for 10 minutes if they're straight from the fridge.
No cocoa butter? Substitute with 4 oz extra butter plus 4 oz shortening, but you'll lose that signature richness. Running low on vanilla? Almond extract at half the amount gives a similar depth. The chocolate chips can be swapped for chopped dark chocolate bars—just make sure it's at least 65% cocoa. For the buttercream, if you can't find cocoa butter, melted dark chocolate mixed into regular buttercream mimics the flavor. The secret to those coveted cracks? Baking at 350°F for exactly 30-35 minutes—no more, no less. And don't skip the hot water for blooming the cocoa—it develops the flavor and makes the cake more tender.
This cake improves with age—24 hours is ideal for maximum flavor development. Store wrapped tightly at room temperature for up to 5 days, or freeze the layers for 3 months (thaw overnight in the fridge). The buttercream keeps for 3 days in the fridge—just rewhip before using. For the showstopper finish, I always dust the top with powdered sugar right before serving. The chocolate chips? Toss them in a 1 tsp cornstarch first to prevent sinking. Trust me, it makes all the difference.
Why You'll Love This Recipe
- No Mixer Needed: I swear by this recipe when I’m too lazy to pull out the stand mixer—just cream the butter and sugar by hand for a few minutes. The sour cream keeps it tender without overworking, and honestly? My arms thank me every time.
- Rich Without Bitterness: That cocoa powder isn’t just any cocoa—it’s the real deal, balanced by the sugar and butter to give you a deep, velvety chocolate flavor. No chalky aftertaste here, just pure, satisfying richness in every bite.
- Birthday or Breakfast: I’ve used this cake for everything from a last-minute birthday surprise to a midnight snack when my kiddo’s friends crash for the night. The texture holds up whether you serve it warm with ice cream or cut into slices for a quick dessert.
- Leftovers That Last: Between us, this cake actually tastes better the next day—if there’s ever a next day. It’s sturdy enough to slice neatly, and the sour cream keeps it moist for days, so you’re not scrambling to finish it off before it dries. Budget win.
Step-by-step instructions for cake boss chocolate cake
Here's how to create that signature rich, fudgy chocolate cake with perfect layers.
👨🍳 Step 1: Bloom the Cocoa for Maximum Richness
In a medium bowl, whisk together the 1 cup unsweetened cocoa powder and 0.75 cup hot water until completely smooth—no lumps allowed. This creates a rich cocoa paste that deepens the chocolate flavor. Let it cool slightly while you prepare the butter mixture. I like to use a fine-mesh sieve to strain any potential lumps from the cocoa powder before blooming.
The reason we bloom the cocoa with hot water is to create a paste that integrates seamlessly with the butter and sugar. This technique, borrowed from professional bakers, ensures every bite delivers that intense chocolate flavor without any gritty texture. Let this mixture sit at room temperature while you melt the butter—it'll thicken slightly as it cools.
🍳 Step 2: Cream Butter and Sugar to Lighten the Batter
In a stand mixer fitted with the paddle attachment, beat the 2 cups unsalted butter (cooled to room temperature) and 2.5 cups granulated sugar on medium speed for 5-6 minutes. You're looking for a light, fluffy texture that nearly doubles in volume and becomes pale in color. This creaming process incorporates air, which creates that signature tender crumb.
Here's the thing—if your butter isn't fully room temperature, the mixture will separate. Press the butter between two sheets of parchment and let it sit for 10-15 minutes if it's too cold. The sugar should dissolve completely into the butter, creating a ribbon-like consistency that holds its shape when the beaters are lifted. This is your signal that the mixture is properly aerated.
👨🍳 Step 3: Alternate Dry Ingredients with Sour Cream
Reduce the mixer speed to low and add the bloomed cocoa mixture in 3 additions, mixing just until combined after each addition. In a separate bowl, whisk together the 2.5 cups all-purpose flour, 1 tbsp baking powder, and 0.5 tsp salt. With the mixer running on low speed, alternate adding the dry ingredients and 1 cup sour cream in 6 additions each, beginning and ending with the flour mixture.
This alternating method ensures even distribution of ingredients without overmixing. The sour cream adds moisture and tenderness, while the dry ingredients provide structure. Scrape down the sides of the bowl with a spatula every 30 seconds to prevent gluten development. The batter should be thick but smooth, with no visible streaks of flour remaining.
🍳 Step 4: Incorporate Eggs and Vanilla for Final Flavor
Add the 4 whole large eggs one at a time, mixing on low speed for 10 seconds after each addition to prevent breaking the air bubbles. Stir in the 2 tsp vanilla extract until just combined. Fold in the 1.5 cups dark chocolate chips by hand using a silicone spatula—this prevents melting them in the warm batter.
I always use room temperature eggs for this recipe because they incorporate more smoothly than cold eggs. The vanilla extract should be pure Madagascar bourbon for that authentic Cake Boss flavor profile. The batter will be thick and fudgy-looking—this is exactly what you want for that signature dense texture. Don't be tempted to add extra flour; the recipe is perfectly balanced as written.
⏰ Step 5: Bake in Layers for Perfect Rise
Divide the batter evenly between two 9-inch round cake pans lined with parchment paper. Bake in a preheated 350°F oven for 30-35 minutes, or until a toothpick inserted in the center comes out with moist crumbs but no wet batter. Rotate the pans halfway through baking for even heat distribution.
The cake should spring back slightly when pressed in the center, with a deep chocolate aroma filling your kitchen. Here's where it gets tricky—overbaking dries out the cake, so start checking at the 25-minute mark. The edges should be set while the center still has a slight wobble. Let the cakes cool in the pans for 10 minutes before transferring to a wire rack to cool completely.
Pro Tips For Making Cake Boss Chocolate Cake
- MEASURE COCOA ACCURATELY: I learned this the hard way—using a scoop from the bag packs cocoa powder too loosely. Instead, spoon it directly into your measuring cups and level it off with a knife. A tablespoon here or there makes a noticeable difference in richness, especially when you’re going for that deep, fudgy texture.
- CREAM BUTTER AND SUGAR LOW: The Cake Boss recipe calls for creaming butter and sugar until light, but I used to rush it on high speed. Lower the mixer to medium and let it run for 3-4 minutes until the mixture is thick, pale, and leaves a trail when you lift the beaters. This step actually changes the cake’s tenderness—no shortcuts here.
- DON’T OVERMIX THE BATTER: Sour cream keeps this cake moist, but once you fold in the flour-cocoa mix, stop mixing the second everything’s just combined. Overmixing develops gluten and turns your cake dense, even if you bake it perfectly. I’ve ruined batches by treating this like a pancake batter—don’t be that person.
- LET THE BUTTER SOFTEN ROOM-TEMP: Cold butter from the fridge won’t cream properly, and you’ll end up with lumps no amount of mixing can fix. Take the butter out 1-2 hours before baking (or microwave it in 10-second bursts if you’re in a hurry). Room-temperature butter blends smoothly, ensuring that fluffy, airy crumb everyone loves.
Dietary considerations for this cake boss chocolate cake
Gluten-Free Adaptation
For a gluten-free version, replace the 2.5 cups all-purpose flour with a high-quality blend like King Arthur Measure for Measure or Bob's Red Mill 1:1 Gluten-Free Flour. These blends contain xanthan gum, which mimics gluten's structure.
Add an extra 1 tsp xanthan gum if your blend doesn't include it, as this helps bind the cake layers. I've tested this substitution and found the texture remains moist, though slightly denser than the original. 💫
Dairy-Free Options
To make this cake dairy-free, swap the 2 cups unsalted butter for 2 cups dairy-free margarine (like Miyoko's Creamery) or coconut oil. For the sour cream, use 1 cup full-fat coconut cream chilled overnight.
The cocoa buttercream requires 8 oz dairy-free chocolate butter (such as Pascha) instead of regular cocoa butter. These swaps maintain the cake's richness while keeping it allergen-friendly.
Lower Sugar Version
Reduce the 2.5 cups granulated sugar to 1.5 cups and replace the remaining 1 cup with monk fruit sweetener (like Lakanto). This keeps the cake moist while cutting sugar by 40%.
For the buttercream, use 3 cups powdered sugar instead of 4, and add 1 tsp vanilla bean paste to enhance flavor. The texture remains tender, though slightly less dense. I recommend using a digital scale for precise measurements with sweetener substitutions.
Vegan Chocolate Cake
For a fully vegan version, replace the eggs with 4 tbsp ground flaxseed mixed with 10 tbsp water (let sit for 5 minutes to thicken). Use 1 cup unsweetened applesauce instead of sour cream, and ensure all butter is dairy-free.
The cocoa buttercream can be made vegan by using coconut oil instead of butter. This version requires slightly longer baking (40-45 minutes) due to the denser batter. The flavor remains rich, though the texture is more compact.
Allergen-Free Storage
Store gluten-free or dairy-free versions in an airtight container with parchment paper between layers to prevent drying. These cakes keep for 3 days at room temperature or 2 weeks in the fridge. For freezing, wrap each layer individually in plastic wrap and place in a freezer bag.
Thaw overnight in the fridge before assembling. The texture remains moist, though the cracks may be less pronounced after freezing. 💡
Nutrition facts
Frequently asked questions
Why does this cake need to bloom the cocoa powder?
Blooming the cocoa with hot water creates a smooth paste that deepens the chocolate flavor and prevents gritty texture. This technique ensures every bite delivers that intense, professional-grade chocolate taste you'd expect from a Cake Boss creation. The hot water activates the cocoa's natural oils for maximum richness.
What's the secret to getting those signature cracks?
Those coveted cracks come from baking at 350°F for exactly 30-35 minutes—no more, no less. The cake needs to be fully set at the edges while still slightly underdone in the center. Let it cool completely in the pan for 10 minutes before transferring to a rack. Patience is key here!
Can I make this cake in a different pan size?
For best results, stick to 9-inch round pans to maintain the proper layer height and texture. If you must use another size, adjust the baking time by 2-3 minutes per inch of difference (smaller pans bake faster). For example, an 8-inch pan would need about 25-30 minutes. Always use parchment paper to prevent sticking.
How do I prevent my cake from being too dry?
Overmixing or overbaking are the usual culprits. Mix only until combined (no more than 1 minute after adding flour) and bake until a toothpick comes out with moist crumbs. The sour cream and melted butter in this recipe keep the cake ultra-moist. For extra insurance, brush the cooled layers with simple syrup before adding frosting.
What's the best way to store leftovers?
Wrap the fully assembled cake tightly in plastic wrap and store at room temperature for up to 5 days. For longer storage, freeze the layers (without frosting) for 3 months. Thaw overnight in the fridge before assembling. The buttercream keeps separately for 3 days in the fridge—just rewhip before using.